
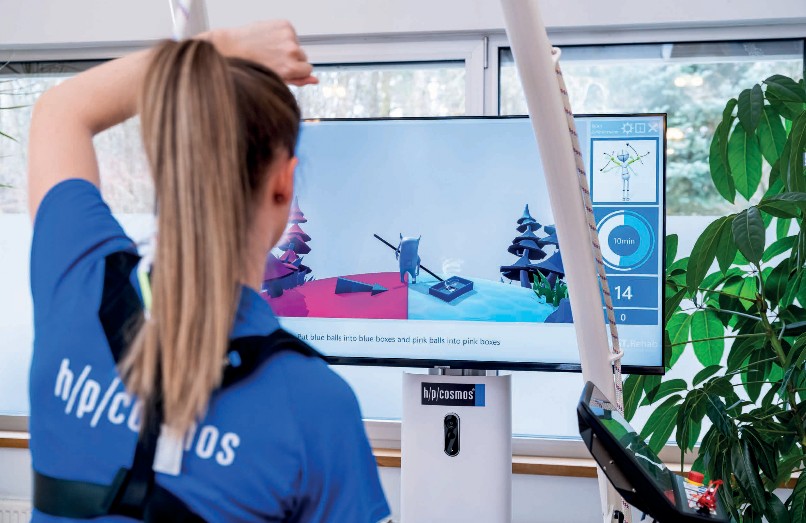
user application manual
Alina Kretz | Application specialist for VAST.Rehab system
Adaptation from the original IFU of Brontes with relevant sections for treadmill use | Version: 23. January 2026
The copyright of this document, media, design, software and intellectual property is owned by h/p/cosmos sports & medical gmbh, except where explicitly stated differently. VAST.Rehab Software: Brontes Processing Sp. z o.o. | WARNING: All rights reserved. Unauthorized copying, reproduction, hiring, lending, public performance and broadcasting (also in extracts) is prohibited. The content and all graphic rights are based on h/p/cosmos® and Brontes original photo and print material.

German Engineering since 1988

Content
Purpose and structure of the manual 6
VAST.Rehab – Functional training with virtual reality 6
Advantages of treadmill functional training with virtual reality 8
VAST.rehab Software – Precautions: Intended Use, Disclaimers and Information clause for VAST.Rehab 9
[4A] Intended Use 9
[4B] Disclaimers 10
[4C] Information clause for VAST.Rehab 11
VAST.rehab – Hardware Set Up 12
[5A] Hardware Set up 12
[5B] Setup Limitations 15
VAST.Rehab – First Application 16
[6A] How To: Install VAST.Rehab & Activate License 16
[6B] How-To: First application with VAST.Rehab 16
VAST.Rehab – Start your Application 17
[7A] How-To: Start your application with VAST.Rehab 17
[7B] Therapist Panel 18
[7B1] Introduction 18
[7B2] Scenarios: Sign in 19
[7B3] Scenarios: Patient’s account 21
[7B4] Scenarios: Workout templates 26
[7B5] Scenarios: Training plans 36
[7B6] Scenarios: Workouts 41
[7B7] Scenarios: Training room 51
[7B8] Scenarios: Reports 57
[7B9] Scenarios: Research 63
[7B10] Tips 80
[7C] Patient Panel 84
[7C1] Introduction 84
[7C2] Scenarios for patients 85
[7C3] Scenarios for therapists 91
[7C4] Settings 98
VAST.Rehab – Troubleshooting 100
[8A1] Via Therapist Panel 100
[8A2] Via Patient Panel 101
Research / Literature 102
Gender Clarification
For reasons of better readability, the simultaneous use of masculine and feminine forms language has been avoided. All references to people apply equally to both genders.
This application manual is supported by photo and video examples to improve visualisation.
To get a first glimpse of the h/p/cosmos X VAST.Rehab application, please take a look at the following YouTube video via the direct link below:

In addition, please take a look at our h/p/cosmos YouTube channel, where you can find more information on using various h/p/cosmos devices, as well as lots of other useful information on applications.

Here is the direct link to the h/p/cosmos YouTube channel:


Read and follow also all warnings and instructions of use (operation manuals) of the individual involved medical devices (software, treadmill, unweighting device, robowalk®, etc.).
Latest h/p/cosmos operation manuals / IFUs: https://www.hpcosmos.com/en/contact-support/media-downloads/manuals Latest h/p/cosmos safety information: https://www.hpcosmos.com/en/safety
Disregard of safety information, intended or forbidden use, as well as unauthorized maintenance or lack of maintenance and regular safety checks may lead to injury or even death and can damage the device. Furthermore, this will result in loss of liability and warranty.
Caution:
Distraction may cause reduced coordination. It is highly recommended to use a fall prevention system, like the h/p/cosmos safety arch with harness or the h/p/cosmos airwalk® ap with harness.
Prescribed fall prevention system for any application where falling might cause an unacceptable risk (osteoporosis, highspeed or special applications with subjects not able to jump off the running belt such as children, physically impaired persons, etc.)
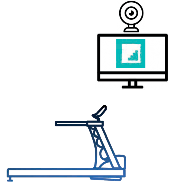
The VAST.Rehab training can be performed on many h/p/cosmos treadmill models and in combination with several options. TV and camera will be positioned in front of the treadmill, where the camera can be placed above or below the TV, depending on further structural features of the treadmill. Items like the crossbar, the centred control panel (pluto® models, adjustable handrails), the safety arch, robowalk expander or arm supports may partially limit the camera´s view.
Software Product name: VAST.Rehab Software Basic UDI-DI: 59044968178VREU
Software Legal Manufacturer: BRONTES PROCESSING Sp. z o.o., Przewozowa 32, 44-100 Gliwice, Poland Software Country of Origin: Poland
Software Medical Classification: Class I (MDR, Annex VIII Rule 11)
The manufacturer declares that the medical device(s) specified above meet the provision of the Regulation (EU) MDR 2017/745 for medical devices. This declaration is supported by manufacturer´s the Quality System approval to ISO 13485:2016.
Legal manufacturer of treadmills:
h/p/cosmos sports & medical gmbh, Am Sportplatz 8, 83365 Nussdorf-Traunstein sales@hpcosmos.com www.hpcosmos.com EUDAMED Economic Operator SRN: DE-MF-000006147
Intended Purpose of VAST.Rehab software:
For detailed information, regarding the intended purpose of VAST.Rehab software see [3].
It is important to notice that the decision to use the devices with their potential risks and complications for diagnosis, rehabilitation or therapy of a particular patient is the essential responsibility of the medical operator.
The clinical user’s judgment, on the other hand, must be based on current knowledge in medical science and the specific situation of the patient. The indications and target population for treadmill testing and treatment have to be determined by the medical doctor and should primarily be based on international accepted guidelines.
Example:
Peruzzi, A., Cereatti, A., Della Croce, U., & Mirelman, A. (2016). Effects of a virtual reality and treadmill training on gait of subjects with multiple sclerosis: a pilot study. Multiple sclerosis and related disorders, 5, 91-96. Link
h/p/cosmos®, robowalk®, airwalk®, robomove® and various treadmill model names, such as pluto®, mercury®, quasar®, pulsar®, locomotion®, etc. are registered trademarks of h/p/cosmos sports & medical GmbH, h/p/cosmos holding GmbH or Franz Harrer.
[1] Purpose and structure of the manual
This user manual is intended as a reference guide for users of h/p/cosmos treadmill systems for functional training and rehabilitation purposes. The first part introduces the treadmill system and its functional training features with virtual reality using VAST.Rehab.
This includes information on the hardware setup and contents, how to start and use the VAST.Rehab software in combination with your h/p/cosmos treadmill system, and troubleshooting.
The final section contains references showing the current state of research on functional training with virtual reality.
[2] VAST.Rehab – Functional training with virtual reality
VAST.Rehab is a revolutionary training solution for h/p/cosmos treadmills. This innovative technology fuses training, rehabilitation, virtual reality and serious gaming, transforming treadmill workouts into active and diverting dual tasking sessions with engaging experiences. With VAST.Rehab, treadmill training is no longer a tiring routine but a dynamic and exciting journey that stimulates the play instinct.
VAST.Rehab allows virtual reality experiences during standing, walking or running on a treadmill. The subject’s body will be tracked by a camera while being on the treadmill. As a dual tasking exercise besides walking, the subject needs to fulfil different tasks, involving the upper limbs, body posture or the position on the treadmill
Therefore, the software also allows you to create specific individualized trainings for every patient in the VAST.rehab software.
Easy games – for young and old
More than 25 interactive games are included, focussing on varying cognitive and motor tasks. The subject is tracked via a special camera and represented live as an avatar to fulfil motion-activated solutions, such as (see figure 1):
Change the position on the running deck (left – right) in order to race an ambulance car through the busy streets of a town
Fold your hands and navigate a spaceship to avoid obstacles
Throw a ball and hit the tins
Swing your arms like you were holding a sword to hit funny vampires
Position your arms like a stick to block balls
huge task generator with many variations of games, choices for body regions to address, as well as time and difficulty
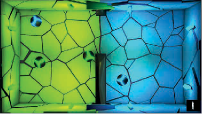

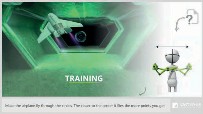
Figure 1. Various interactive games by VAST.Rehab
Playful and motivating games for better therapy success
Fun factor motivates both young and old patients to try their best earning as many points as possible in every game, as their success becomes visible 1:1 through the direct visual feedback in the game
whereby the training can be started at any therapy level (whereby both the cognitive and physical performance level can be set individually in the software and can also be updated at any time)
The use of virtual reality allows patients to move away from monotonous gait therapy towards fun, playful training, naturally distracting them from their physical and mental limitations by playing various games. This makes therapy much more enjoyable, increasing patient motivation and potentially leading them to surpass their fatigue threshold without even realizing it, as they are distracted from the therapy situation itself (Winter et al., 2021). This may lead to an increased number of steps collected per therapy session, and therefore potentially faster and greater therapy success. Another major advantage is that therapists can intervene directly at any time, either indirectly via the software or physically, for example by using the therapist seats on the side of the h/p/cosmos treadmill to make direct corrections to the gait pattern.
Full field of vision – Virtual Reality via TV screen
The VAST.Rehab software is operated via a TV screen, which we recommend positioning directly in front of the patient alongside the recording camera. The key benefit of virtual reality when used via a screen is that patients' full field of vision is maintained. This helps to prevent motion sickness, which can restrict sensory channels and lead to uncertainties in movement execution.
By using the application on a screen, patients can always see where they are positioned on the treadmill. Consequently, using VAST.Rehab alongside the application does not restrict the patient's usual range of motion, and reduces the potential inhibition threshold for using this VR option — particularly for older people.
Another advantage of using a screen is that it is much easier to clean and maintain hygienically, especially in clinical settings, than devices that are attached directly to the patient and come into contact with them.
Possible variations in application use
Any additional applications on the h/p/cosmos treadmill (e.g. safety arch, airwalk®, robowalk®) can be used to their full extent, as the webcam has no restrictions on recording the limbs. There only may be limitations regarding the camera’s field of view (see Setup Limitations).
Applications can be used both bilaterally and unilaterally
VAST.Rehab uses a wide variety of therapeutic tasks to enable training in all rehabilitation domains:
[According to the original IFU of Brontes]
Musculoskeletal
Range of motion
Strength
Endurance
Fitness and cardiovascular training
Neurological
Movement quality (gross and fine motor skills)
Movement awareness and proprioception
Bilateral movements in response to bilateral stimulation
Balance and Equilibrium
Trunk and postural control
Anticipatory postural responses
Adequate reactions to stimuli and distractors placed in preplanned or random positions
Crossing the midline
[3] Advantages of treadmill functional training with virtual reality
Effortless, Safe, and Compliant
VAST.Rehab boasts a vast, diverse, and inclusive exercise library, offering an array of therapy-focused games to keep your patients engaged and challenged. The easy-to-use platform ensures a safe and compliant environment for effective rehabilitation.
Rehabilitation by Fun
Who said physical therapy has to be monotonous and boring? With the advancements in technology, the world of therapy has transformed, allowing patients to enjoy their journey to recovery. It's no secret that the more we enjoy a process, the more likely we are to commit to it, and rehabilitation is no exception.
Advantages: VAST.rehab vs. other solutions
The satellite PC including VAST.rehab is very inexpensive compared to other solution systems – like the satellite PC in combination with the zebris system, for example.
The camera and the software license are also available “only” as an upgrade to the Satellite PC equipment
Unique selling point: With just one therapist terminal (1 license), several patient terminals can be controlled simultaneously with individual training sessions; at this moment, no alternative medical software system is able to do so
The augmented Feedback in VAST.Rehab provides real-time functional feedback (knowledge of results and knowledge of performance) in a motivating game like environment
The speed and elevation are projected with great accuracy due to the coscom v4 connection between the software and the h/p/cosmos treadmill
[4] VAST.rehab Software – Precautions: Intended Use, Disclaimers and Information clause for VAST.Rehab
[According to the original IFU of Brontes]
[4A] Intended Use
It has been stated repeatedly that active participation in rehabilitation programs increases the benefit and effectiveness of therapy. The use of repetitive and sometime boring tasks produces a significant reduction in patient motivation. To combine therapy with appealing games, then, is not only a matter of creating entertainment, but a real necessity for recovery.
Features and Functions
VAST.Rehab, an innovative video capture virtual reality system, offers functional therapy using movement and position recognition proprietary technology. The touch-free (without external accessories there is no danger of contamination spreading or sterilization need) motion-activated solutions for virtual reality rehabilitation are used by clinicians in all rehabilitation health professions. The system is suitable to be used to treat a wide variety of patients, with a full library of interactive tasks and activities that can be tailored for children or seniors. VAST.Rehab supports medical professionals in following functionalities: Evaluation, Treatment, Feedback, Documentation.
Evaluation
VAST.Rehab allows patients assessment, using a personally tailored appropriate configuration to the patient's ability, evaluation of results and development of treatment plans (e.g. evaluation tasks: Reach test, Angles evaluation, Stability test, Romberg's test, Unterberg's test, Dynamic test).
Treatment
VAST.Rehab uses a wide variety of therapeutic tasks to enable training in all rehabilitation domains:
Musculoskeletal
Range of motion
Strength
Endurance
Fitness and cardiovascular training
Neurological
Movement quality (gross and fine motor skills)
Movement awareness and proprioception
Bilateral movements in response to bilateral stimulation
Balance and Equilibrium
Trunk and postural control
Anticipatory postural responses
Adequate reactions to stimuli and distractors placed in preplanned or random positions
Crossing the midline
Feedback
The augmented Feedback in VAST.Rehab provides real-time functional feedback (knowledge of results and knowledge of performance) in a motivating game like environment. By monitoring movements, it guides the patient through exercises specifically designed for therapy. It encourages and motivates the patient to achieve a higher number of repetitions, which helps improving the compliance and the therapy outcome. The exercises are adjustable according to the patient's needs and progress, and therefore provide a challenging and effective therapy.
Documentation
VAST.Rehab software captures the patient's training activity and progress providing relevant documentation about the therapy process and the patient's compliance. Furthermore, the stored documentation offers information such as training accuracy, duration and frequency. Allowing accurate monitoring of the patient's training progress, the VAST.Rehab documentation supports clinical decision making. The Therapist in charge has the sole responsibility for a rehabilitation treatment and decides whether a patient is fit for a specific treatment. In particular, the therapist must weigh in each individual case possible risks and side-effects of the treatment against the expected benefit. In addition, the patient’s individual situation plays just as important a role as the basic risk assessment for specific patient groups. The person in charge of using the system is responsible to adapt the training sessions and the course of therapy to the patient’s abilities. Being a scientific discipline,
medicine and rehabilitation are subject to constant advances of knowledge and treatment principles. The therapist in charge must continually keep his knowledge up-to-date by reading the latest scientific literature and must monitor changes in use recommendations during the course of treatment.
[4B] Disclaimers
VAST.Rehab is a medical device and must be used in strict adherence to this document and software manuals. Failure to do so may result in serious personal injury. It is strongly recommended to regularly check VAST.Rehab website for the latest available information. Please contact if you have any question.
VAST.Rehab is to be used only under the supervision of qualified medical personnel. However, VAST.Rehab can be in certain conditions marketed for home use and must be strictly used according to the recommendations of your medical care provider who is knowledgeable about your specific needs. Read this document and software manuals for appropriate product designation. Failure to obtain and follow the recommendations of your medical care provider may result in serious personal injury.
This document provides details about a medical product which may not be available in all countries and may not have received approval or market clearance by all governmental regulatory bodies throughout the world. Nothing herein should be construed as a solicitation or promotion of the product or of an indication of any specific use for the product which is not authorized by the laws and regulations of the country where the reader of this information resides.
Intended purpose
VAST.Rehab purpose is to support functional therapy for patients who have lost the function of or have restricted function in their body or cognitive functions caused by cerebral, neurogenic, spinal, muscular or bone-related disorders. Considering the contraindications and every patient’s individual profile, the device is used in the case of:
Cerebrovascular Accidents
Multiple Sclerosis
Cerebral Palsy
Parkinson`s Disease and Extrapyramidal Syndromes
Brain-tumor operations
Spinal cord injuries
Traumatic brain injury
Muscular atrophy
Deconditioning - Muscle weakness due to lack of mobility
Endoprosthesis for hip, knee, elbow and shoulder joints
Following stable fractures of vertebra and/or extremities
Limb amputations with or without prosthesis
Balance and Equilibrium disturbances
Just as for any other therapy, the therapist in charge is always responsible for the indication. Functional training with VAST.Rehab is not possible or indicated in every case. In general, the device must not be used in the following cases to avoid causing harm to the patient. The following precautions must therefore be observed in particular:
Severe osteoporosis
Contractures affecting the relevant extremity
Skin lesions in the area of the relevant extremity
Joint subluxation or severe pain in the target joint
Severe spasticity
Severe spontaneous movements, e.g. ataxia, dyskinesia, myoclonic jerks
Severe postural instability
Cardiac arrhythmia, hypotension or severe hypertension
Confused or non-cooperative patients
Severe cognitive deficits
Patients requiring isolation due to infections
Severe visual problems (patient is not able to see displayed elements on the computer screen)
The following contraindications must therefore be observed in particular:
Not controlled epileptic seizure within the past two years, or photosensitive patients
Retinal disease which may be exasperated by watching video games
Bone instability (non-consolidated fractures in vertebrae or extremities)
Osteomyelitis or other inflammatory/infectious diseases
Bone Cancer, including spinal tumors or metastases to vertebrae or joints
Pronounced, fixed contractures affecting the relevant extremity
Open skin lesions in the area of the relevant extremity
Non-stable vital functions: Pulmonary or cardio-circulatory contraindications
Spondylolisthesis (second degree or higher) or with neurological signs
The above list does not claim to be exhaustive. In case of patients with chronic diseases and/or patients with illnesses coexisting with the one in which therapy VAST.Rehab’s support is used and/or patients who have been immobile for a long period of time, special attention is required and short training sessions are recommended to begin with. An over-reaction is expected from these patients if training sessions are too long. On the other hand, patients often tend to have a certain euphoric reaction after the initial treatment, and want to have longer and/or more frequent training sessions. This can result, in the case of the patients described above, in excessive strain being exerted on ligaments, tendons and joints.
The decision as to whether a patient is suitable for treatment always comes under the remit of the therapist in charge, who has sole medical responsibility for the treatment. As part of this, he must evaluate in particular, in each individual case, possible risks and side-effects of the treatment against the benefit gained from it. In addition, the patient’s individual situation plays just as important a role as the basic risk assessment for specific patient groups.
[4C] Information clause for VAST.Rehab
According to art. 13 section 1 and 2 of the General Data Protection Regulation dated on 27 April 2016, we inform you that:
The administrator of your personal data is BRONTES PROCESSING Sp. z o.o. Ul. Przewozowa 32, 44-100 Gliwice, Poland.
Your personal data is processed for the purpose of establishing an online account in the VAST.Rehab software platform and for statistical purposes. The processing takes place on the basis of Article 6 (1b) and (1c) and article 9 (1h) of the GDPR.
The recipient of your personal data will be the entities authorized by the controller of the personal data, entities authorized by law and external entities under signed contracts.
Your personal data will be kept for a period consistent with applicable law.
You have the right to access your personal data and the right to rectify, delete, limit processing, the right to data transfer, the right to object, the right to withdraw consent at any time without affecting the legality of processing, which was made on the basis of consent before its withdrawal.
You have the right to lodge a complaint with the supervisory body when you feel that the processing of personal data concerning you violates the provisions of the General Data Protection Regulation of 27 April 2016.
Providing personal data is a prerequisite for the purpose of processing. If you do not provide your personal information, it will not be possible to process it.
Your personal data will not be subject to automated decision making or profiling.
[5] VAST.rehab – Hardware Set Up
[5A] Hardware Set up
What is included in the VAST.Rehab software package:
VAST license for treadmill (cos104823_lic) + camera use
License dongle (cos104823_dng)
What is needed:
h/p/cosmos treadmill with Touch Pro user terminal for coscom v4 connection via Ethernet
h/p/cosmos treadmill with MCU5 user terminal without connection to PC is also possible, without taking speed in games into account
optionally to measure and transmit step frequency: speed sensor (cos101000_brake_as) and FTMS interface (cos101000_FTMS) to transmit also step frequency
State of the art PC system e.g. h/p/cosmos satellite PC (cos14970-03)
TV (e.g. cos102397) and TV stand (e.g. cos101624) or mount
High-resolution camera incl. mount (cos104823_cam) for body detection
Minimum system requirements (subject to alterations):
Windows 10
Intel i3 CPU or better
8 GB RAM
1 PC monitor minimum, 2 PC monitors recommended
Use of Touch screen is possible
USB, Ethernet and Bluetooth interface
VAST.Rehab camera module (cos104823_cam) consisting of
highspeed HD USB camera
camera mount, incl. 3x adhesive tape
Switch on and connect everything
In case of connection errors, please try to use the coscom communication in the unencrypted version (treadmill settings OP 505)
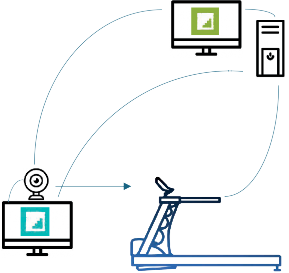
We generally recommend placing the camera in the middle of the treadmill, at a distance of 30–60 cm from the h/p/cosmos treadmill. For example, you could use the back of the motor cover as a reference point. We also recommend placing the TV in front of the treadmill, in the centre of the running belt. However, it is even more important to position the camera correctly to ensure that its field of view is not limited. We also recommend rotating the UserTerminal (see Figure 2. An example of how to set up and connect everything) to further expand the camera’s field of view.
The position of the camera should depend on the type of treadmill and equipment used, so that as few objects as possible restrict its field of vision. With a h/p/cosmos pluto® treadmill featuring a safety arch, for example, the camera can be positioned above the treadmill. Alternatively, filming can be done from a 'middle height' position. In general, the camera position should be selected so that the entire patient can be seen within the camera's field of view, even with their arms outstretched. This should be checked in the camera settings.
If your h/p/cosmos treadmill system includes a robowalk® expander front, we recommend positioning the camera at least 40 cm in front of it to achieve a wider field of view. With the camera positioned in this way, you can move the front expander bars on both sides up to stage 4 without obstructing the camera's view.
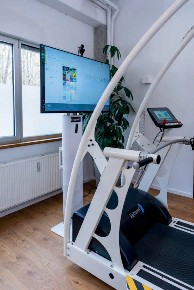
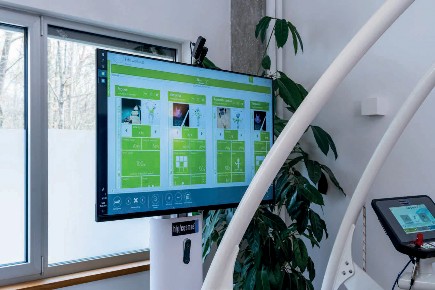
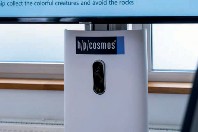
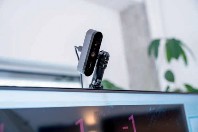
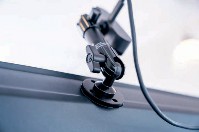
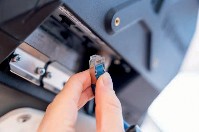
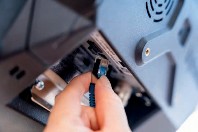
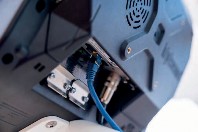
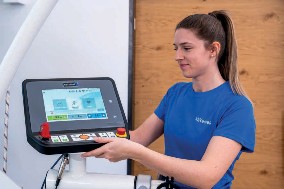
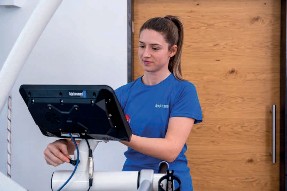
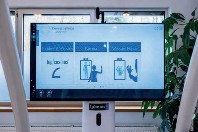
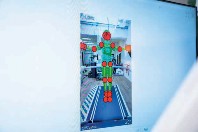
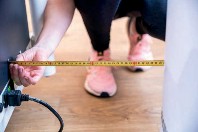
Figure 2. An example of how to set up and connect everything
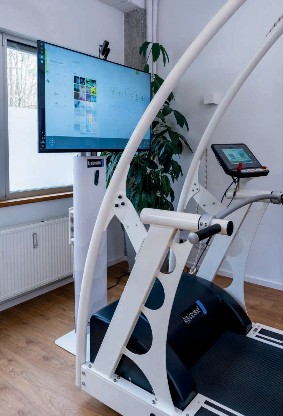
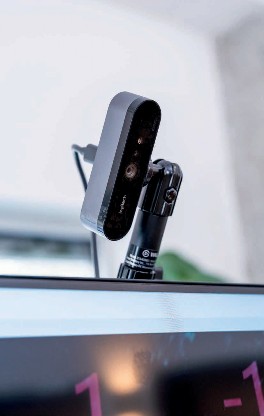
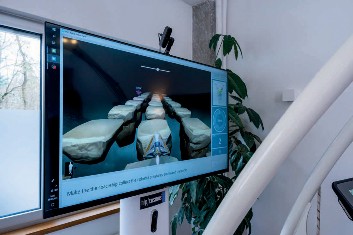
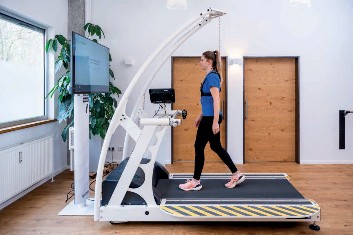
Figure 3. Complete hardware setup recommended by h/p/cosmos (h/p/cosmos treadmill, VAST.Rehab software displayed by and TV, camera)
[5B] Setup Limitations
Setup limitations – camera’s field of view:
h/p/cosmos pluto® (med):
As the UserTerminal is positioned in the centre, directly in front of the camera, the camera's smaller field of view may result in performance limitations. The same applies to the h/p/cosmos mercury® (med), which has adjustable handrails and also positions the UserTerminal in the centre.
UserTerminal:
If the User Terminal is positioned on the right, we recommend turning it outwards to increase the camera's field of view and improve performance.
Safety arch:
If the camera is positioned too far in front of the running surface and safety arch, the camera's smaller field of view may result in performance limitations. We recommend checking the “treadmill webcam” settings to adjust the standing position of the camera or satellite PC to check the camera’s field of view.
robowalk® Expander Front:
The same applies here as for the safety arch. If the camera is positioned too far in front of the running surface and the robowalk® Expander Front, the field of view of the camera may be smaller, which could affect performance. We recommend checking the “treadmill webcam” settings to adjust the standing position of the camera or satellite PC to check the camera’s field of view.
robowalk® Expander Back:
If the robowalk® Expander Back is positioned inwards, the camera may incorrectly identify it as a lower extremity, which could result in performance limitations.
Adjustable handrails:
The adjustable handrails for mercury® models (cos102010-01va02) will also cause the user terminal to be in the centre. The same limitations like for pluto® applies (see above).
If the adjustable handrails are positioned very close together, the camera's field of view may be reduced.
We do not recommend using the adjustable arm supports for handrails for this application, as most games require flexibility in your position on the treadmill and often involve arm movements. We also advise against using them too tightly, as this may restrict your movement and reduce the camera's field of view.
Amputations and one-sided paralysis:
There may be performance limitations if amputations or one-sided paralysis are present.
Clothing:
Performance may be impaired if patients are wearing items of clothing such as skirts or ponchos. For example, the camera may recognize the position of the legs and arms incorrectly or inaccurately.
Moving people in the background:
If there are people moving in the background of the camera's view, the camera's performance may be limited as it may incorrectly identify those people as the "main subject".
Apart from the limitations mentioned above, the VAST.Rehab software is compatible with most available options for the h/p/cosmos treadmill systems, such as the adjustable handrails, the airwalk® ap for body weight support, the perturbation module, the Optogait, the Zebris system, etc.
[6] VAST.Rehab – First Application
[6A] How To: Install VAST.Rehab & Activate License
As soon as you switch on your h/p/cosmos satellite PC for the first time, the VAST.Rehab software is already installed, and your license has been activated by h/p/cosmos.
What to do when I get the VAST.Rehab as a retrofitting?
First, switch on your (h/p/cosmos satellite) PC
Then go to the Microsoft Store and search for “VAST.Rehab” --> the list of available apps will be displayed.
install the VAST.Rehab Therapist Panel and the VAST.Rehab Patient Panel
[6B] How-To: First application with VAST.Rehab
If VAST.Rehab is already installed, the patient panel and the therapist panel are already displayed on the screen of your PC. Now go to the Therapist Panel and log in for the first time (see Figure 4. Login via therapist panel).
First login: Use the user data that you got from h/p/cosmos for your first log in.
Very Important: Please change your access data in the profile settings immediately after logging in for the first time.
o Go to Therapist Panel
Dashboard
‘Edit account data’
‘Change password’ (click on symbol bottom left hand corner)
Type in your new password
Set your new password by clicking on the symbol ‘Change password’ on the bottom right hand corner.
Now you can start your first application with VAST.Rehab!
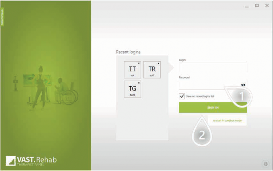
Figure 4. Login via therapist panel
[7] VAST.Rehab – Start your Application
[7A] How-To: Start your application with VAST.Rehab
How To: Start Application
Switch on the hardware (h/p/cosmos treadmill and PC)
The VAST.Rehab app/software starts automatically as soon as the PC is switched on
Overall information regarding the VAST.Rehab App
The app includes separate panels for therapists and patients.
Both “panels” start automatically as soon as the PC is switched on and the VAST.Rehab app / software opens
Both the therapist panel and the patient panel can be controlled and edited by the therapist.
As there are two different panels, you – as a therapist – have to switch between these two visible panels if you only got one screen for application. Therefore, please use the Windows menu/task bar (Windows symbol on the keyboard) to select either the therapist panel (green app logo) or the patient panel (blue app logo)
h/p/cosmos recommends using an additional screen for the therapist panel, as this eliminates the need for constant switching between panels in front of the patient. It also makes it easier to maintain an overview, particularly when controlling multiple patient terminals from a single therapist panel.
The VAST software platform comprises a therapist panel and a patient panel. Both panels can run on the same PC, or on separate PCs if there are multiple patient stations.
The therapist panel enables users to create and manage patients, as well as assign and define their training targets. It includes the Evaluation, Treatment, Feedback and Documentation functionalities.
The patient panel is the gamified part of the system located in front of the treadmill on a large TV to display the patient's games and results.



Before you begin your first application with VAST.Rehab, we recommend reading the 'Tips’ chapter in this VAST.Rehab manual first. There are lots of interesting tools to help you optimize your workflow, such as adjusting the UI scale for better readability and larger symbol scaling.
General info: new software versions
This user manual is an adaptation of the original IFU of Brontes for the VAST.Rehab software, with relevant sections for treadmill use.
Please note that the graphics and content in this manual are from software version [2022.1], so details regarding colours, graphics and usage may differ in updated software versions.
Here you can find the link to the original IFU of Brontes, which is updated by the newest software versions.
[7B] Therapist Panel
The therapist panel allows to create and manage patients. Afterwards the therapist assigns the available selection of trainings as well as personalized training targets. The software also includes features for evaluation, feedback and documentation.

Figure 5. Logo icon software therapist panel
[7B1] Introduction
What is therapist panel used for?
The VAST.Rehab Therapist Panel application is used to create accounts for patients, start and plan workouts, securely access patients' performance metrics, and to analyze reports. It enables therapists to remotely monitor patients' progress, adjust tasks' difficulty, and communicate with their patients.
[7B2] Scenarios: Sign in
How to log in to the therapist panel?
Get your login and password from VAST.Rehab administrator in your facility. The administrator can create your account in VAST.Rehab Administrator Panel.
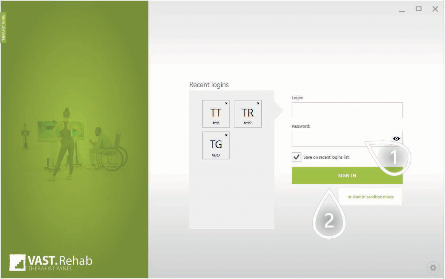
Figure 6. Login via therapist panel
Check the box to save your login in the recent logins section
Click to proceed
Edit therapist’s account
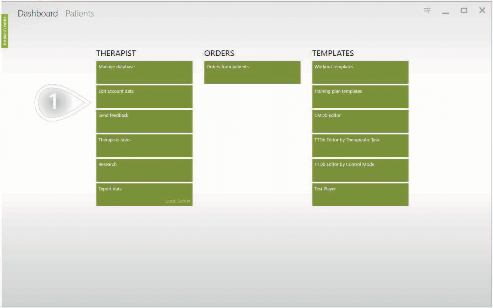
Figure 7. Dashboard overview
1 Click to proceed
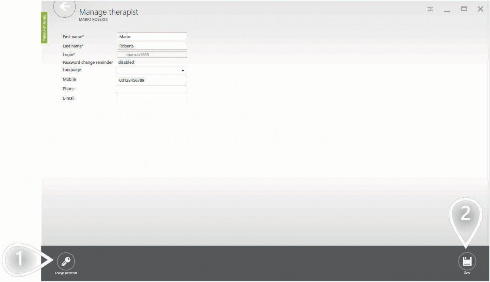
Figure 8. Manage therapist form
Click the button to change your password
Click to proceed
[7B3] Scenarios: Patient’s account
Create patient’s account
Therapists are expected to create a dedicated account for each patient.
The patient's account is used to start and plan the therapy and store all the data gathered by the software: patient's personal data, workout's history, reports and notes about the patient.
It lets therapists track progress and automatically document the whole therapy.
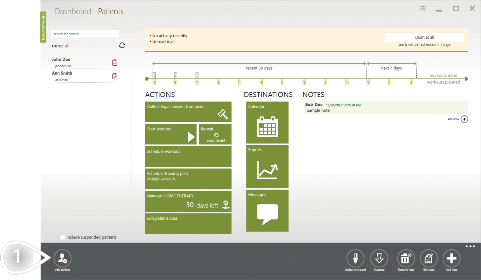
Figure 9. Create patient’s account – symbol ‘add patient’
1 Click to proceed
Provide details about the patient that will be using this account.
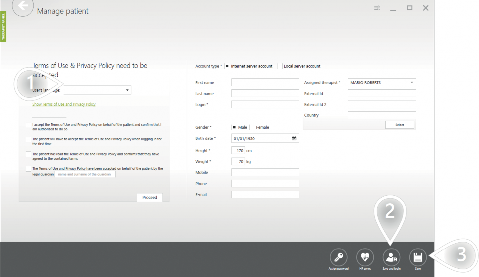
Figure 10. Create patient’s account – add & save information
In case you are using 'Local Server' and at the same time you are connected to the Internet - you need to decide on which server you want the account to be created. The default option is 'Internet Server' because those accounts are anyhow automatically copied to the local server, and at the same time, they can be used for home therapy in the future.
If you have information about the patient's HR zones, you can add and manage them here.
Click to proceed
Creating notes
You can use VAST.Rehab Therapist Panel as a simple CRM system.
Use it to note information about patient's preferences or reports you need to talk about. Use it also to keep in touch with your patient. For example, you can track phone calls.
How? If you call the patient to ask why he or she skipped some home therapy workouts last week, you can hear your patient is on three weeks' holiday.
Just create a note about it, and if software alerts you again that the patient skipped some workouts, you can simply dismiss alert without calling your patient again.
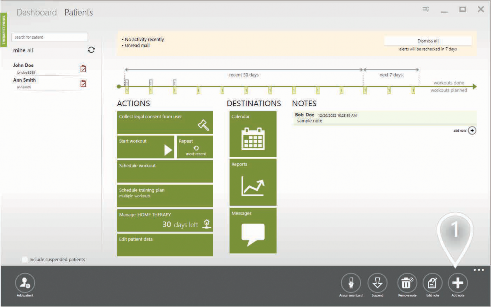
Figure 11. Creating notes about your patient
1 Click to proceed
Here you can enter your note
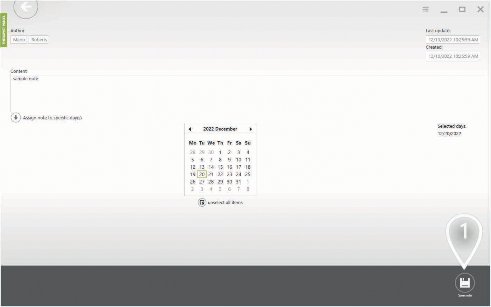
Figure 12. Creating notes – enter note
1 Click to proceed
Find patients who need your attention
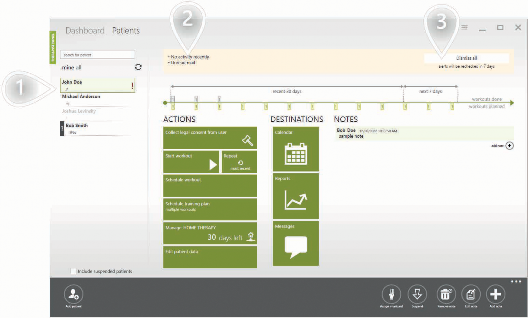
Some of the patients on the list can be marked with an exclamation mark. The exclamation mark informs you that the patient needs your attention. It appears when you receive a message from your patient, when home therapy is about to expire or when the patient is not performing his workouts according to the schedule. It's easy to spot patients with an exclamation mark because they are always shown on the top of the list.
Figure 13. Patient on the list with exclamation mark
An example of our exclamation mark
The reason why the patient needs your attention
When all issues are resolved - please click the 'Dismiss all' button
Check whether patient works according to the schedule
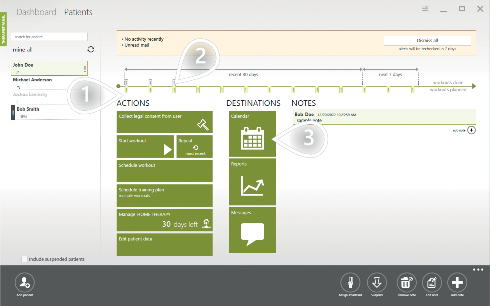
Figure 14. Patients overview
The green rectangles present the scheduled workouts
The grey rectangles present the workouts completed by the patient.
We can see that the patient completed his last workout about 20 days ago.
Open the calendar to see planned vs. completed workouts within wider time frame
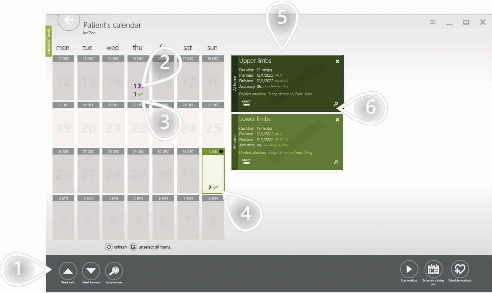
Figure 15. Patient’s calendar
The buttons help you navigate through the calendar
Skipped workout
Completed workout
Select one or more days
List of workouts scheduled for the selected days
Show report
Suspend patient’s account
Keeping patients list clean helps you work faster and more efficiently.
VAST.Rehab lets you suspend unused patients' accounts.
Suspended accounts don't appear on the list unless you tell the system to do so.
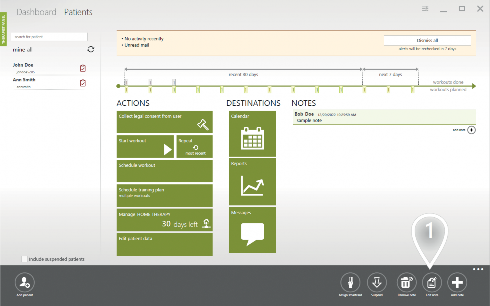
Figure 16. Suspend patient’s account
1 Click to proceed

You can load suspended patients back onto the list.
Suspended accounts appear grayed out to distinguish them from active accounts.
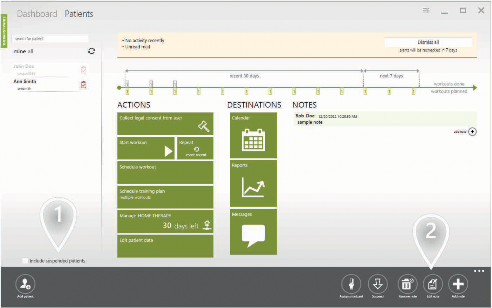
Figure 17. Suspended account appears grayed out
Load suspended accounts
Restore a suspended account to be active again
[7B4] Scenarios: Workout templates
What is a workout template and when to use it?
Workout template is built from segments. It describes the structure of a workout.
It has information about the duration of the therapy session, which is calculated as a sum of durations of the segments it contains.All segments included in the workout template are being executed one after another.
You can create your own workout templates, so you can use them quickly to start or plan workouts for your patients.
Create template using generator
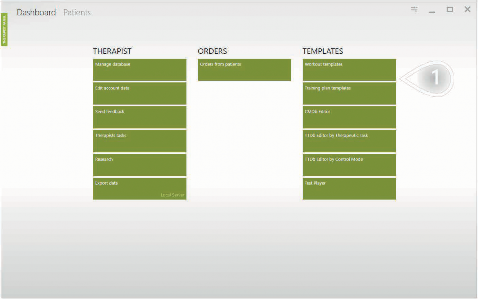
Figure 18. Choose button workout templates on dashboard overview
1 Click to proceed
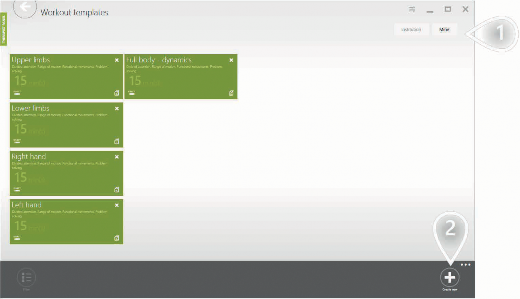
Figure 19. Workout templates overview
The 'Mine' tab contains your elements that are not shared with other therapists. The other tab contains elements available for each therapist in your facility.
Click to proceed
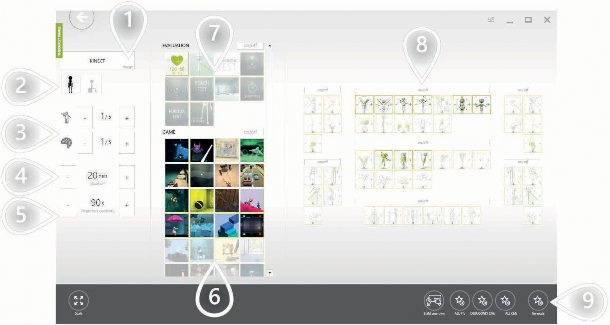

Figure 20. Create workout template by using generator
Select device
Filter control modes (standing and/or sitting)
Set suggested physical and cognitive difficulty.
Based on those settings system suggests adequate therapeutic tasks and control modes.
Set workout's duration
Set duration for each therapeutic task
Based on the chosen physical and cognitive difficulty - there are some therapeutic tasks preselected. You can modify the list manually.
Evaluations are not added to the workout automatically.
Please click on the evaluations you'd like to have included in the workout.
Based on the chosen physical and cognitive difficulty - there are some control modes preselected. You can modify the list manually. The greater the weight is - the more times it will be used.
Click to proceed
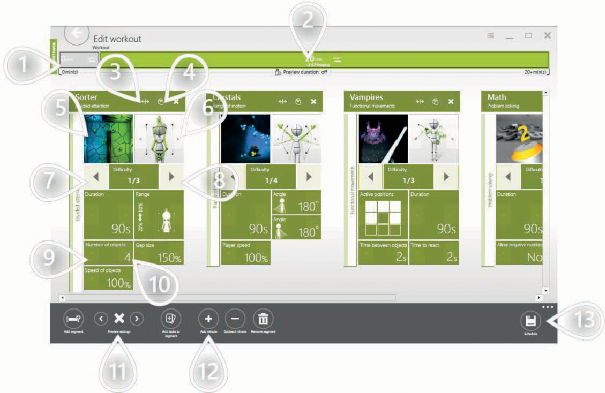

Figure 21. Edit workout
Therapeutic tasks in the workout are grouped by their type.
All evaluations are placed in a separate evaluation segment where all tasks are executed only once.
The normal segment has duration assigned and the tasks it contains are executed one after another till the time is over.
Move the task to another position
Clone the task
Replace the task
Replace the control mode
Make task easier
Make task harder
Previous parameter preset

Next parameter preset
Decide whether fullscreen instruction shall be visible for the patient before each therapeutic task
Set workout's duration
Click to proceed
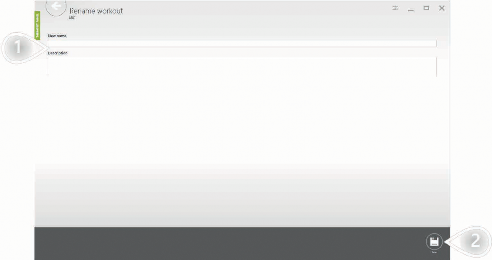
Figure 22. Rename workout
Assign name and description
Click to proceed
Create template from scratch
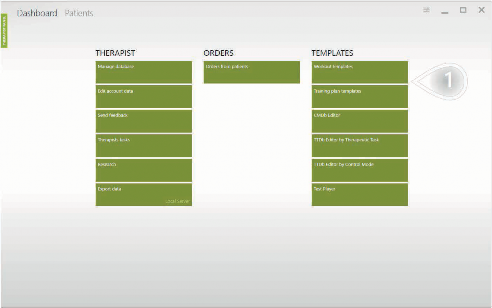
Figure 23. Choose button workout templates on dashboard overview
1 Click to proceed
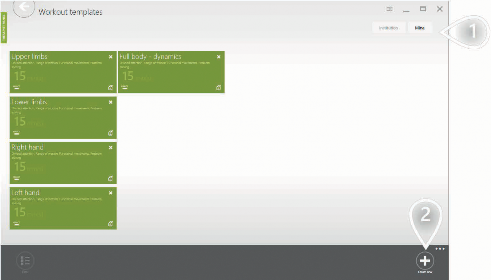
Figure 24. Overview workout templates
The 'Mine' tab contains your elements that are not shared with other therapists. The other tab contains elements available for each therapist in your facility.
Click to proceed
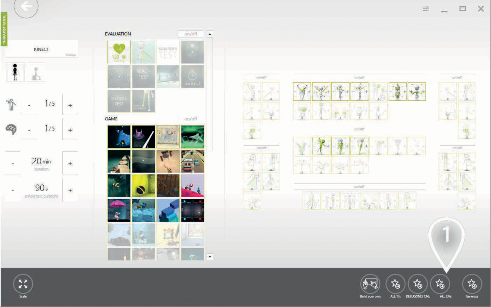
Figure 25. Generate workout template
1 Click to proceed
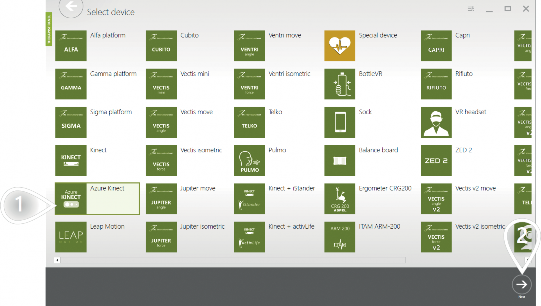
Figure 26. Available devices overview
Select device
Click to proceed
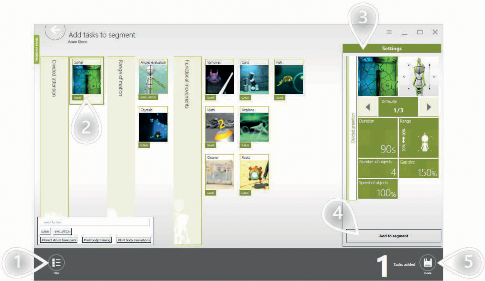
Figure 27. Add tasks to segment
Open filter options to find therapeutic tasks easier
Select a task
Adjust settings
Add the therapeutic task to the segment
Click to proceed
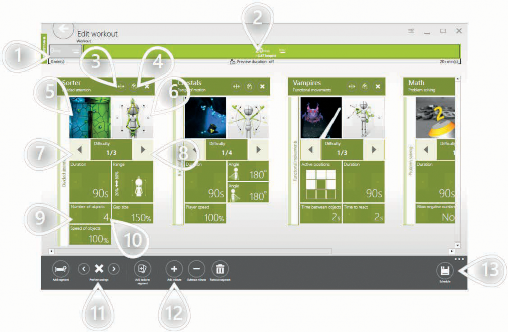
Figure 28. Edit workout
Therapeutic tasks in the workout are grouped by their type.
All evaluations are placed in a separate evaluation segment where all tasks are executed only once.
The normal segment has duration assigned and the tasks it contains are executed one after another till the time is over.
Move the task to another position
Clone the task
Replace the task
Replace the control mode
Make task easier
Make task harder
Previous parameter preset
Next parameter preset
Decide whether fullscreen instruction shall be visible for the patient before each therapeutic task
Set workout's duration
Click to proceed
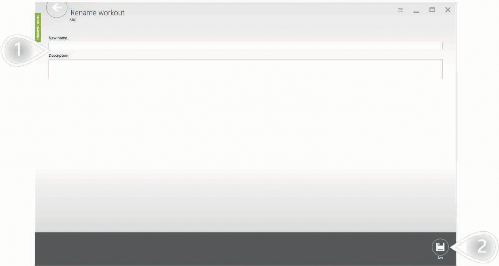
Figure 29. Rename workout
Assign name and description
Click to proceed
Edit / remove workout templates
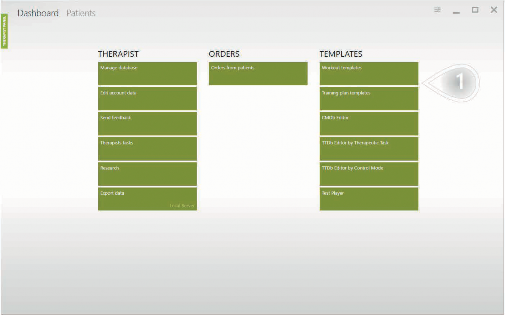
Figure 30. Dashboard overview
1 Click to proceed
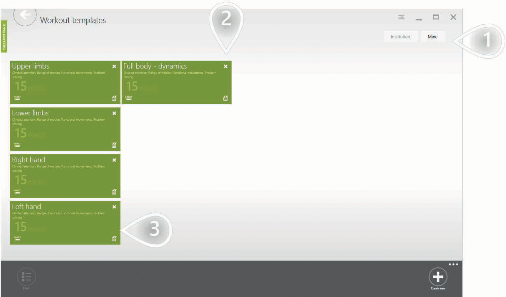
Figure 31. Symbols for editing / removing workout templates
The 'Mine' tab contains your elements that are not shared with other therapists. The other tab contains elements available for each therapist in your facility.
Remove element
Edit element
[7B5] Scenarios: Training plans
What is a training plan and when to use it?
Training plan is a collection of workout templates.
You can design a structure of therapy for several weeks.
Then you can assign the created training plan to any patient with just a few clicks.
Creating training plan
The picture below presents a training plan template planned for 4 weeks. It has 3 working days per week.
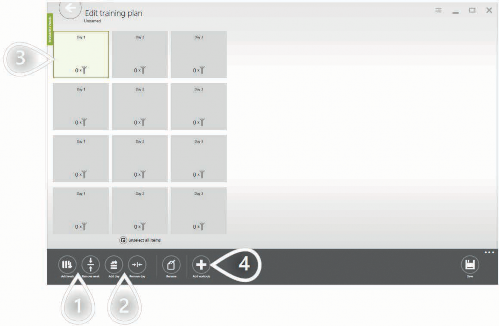
Figure 32. Training plan template planned for 4 weeks
Set number of weeks
Set number of working days per week
A selected working day. You can select many elements simultaneously.
Add a workout template for selected working days
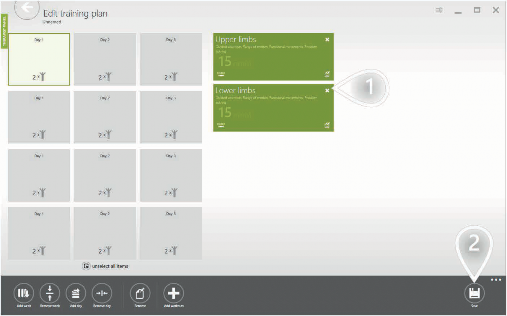
Figure 33. Edit training plan
Workouts planned for selected working days
Click to proceed
Assign a training plan to your patient
Assigning a single workout for patients every time they come is not the only option.
You can assign multiple workouts at once and this is what training plans are designed for.
It would be especially beneficial if you prepare a training plan for the groups of patients you most often work with.
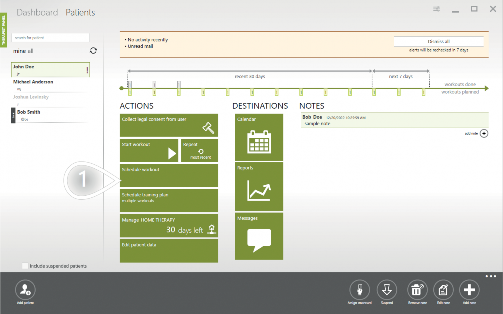
Figure 34. Select ‘Schedule workout’ at patient overview
1 Click to proceed
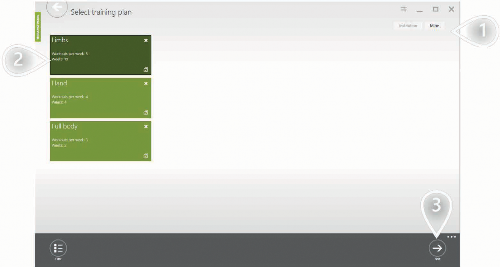
Figure 35. Select training plan
The 'Mine' tab contains your elements that are not shared with other therapists. The other tab contains elements available for each therapist in your facility.
Select a training plan
Click to proceed
Here you can customize the training plan.
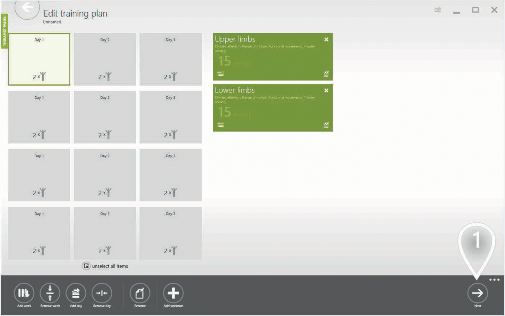
Figure 36. Edit training plan
1 Click to proceed
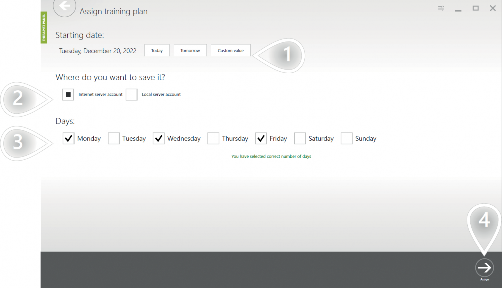
Set the start date
Figure 37. Assign training plan
If you want the assigned workouts to be available from other locations (e.g. from home) you need to use the Internet option - it is the default option.
Check the box near the days you want your patient to exercise on
Click to proceed
Edit / remove training plans
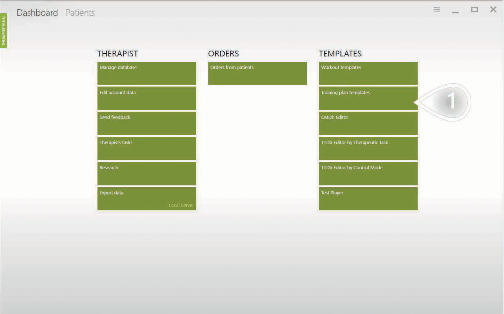
Figure 38. Dashboard overview
1 Click to proceed
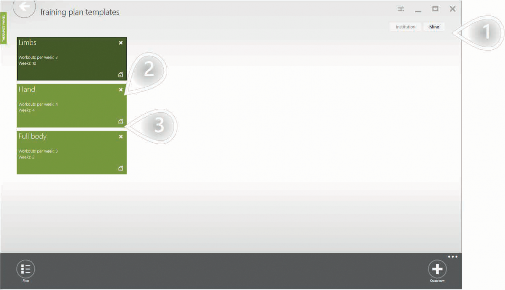
Figure 39. Training plan templates overview
The 'Mine' tab contains your elements that are not shared with other therapists. The other tab contains elements available for each therapist in your facility.
Remove element
Edit element
[7B6] Scenarios: Workouts
What is a workout?
Workout is a therapy session planned for a given patient.
The workout is always planned for a specific day and it is based on a workout template that describes its structure and duration.
Start workout using generator
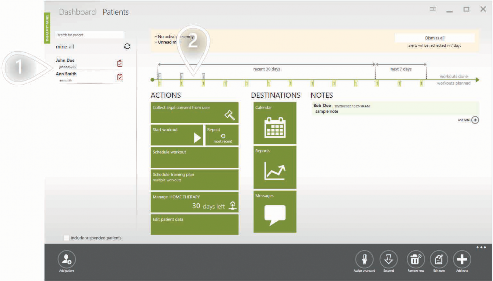
Figure 40. Patients overview
Select a patient
Click to proceed
If you have only one patient station this view will not appear.
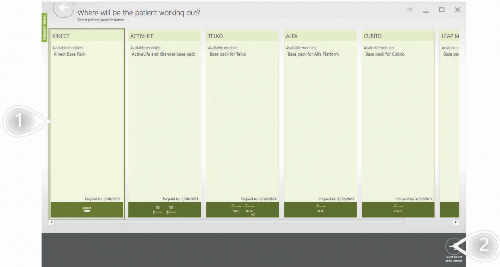
Figure 41. Overview of all available patient stations
Select a patient station
Click to proceed
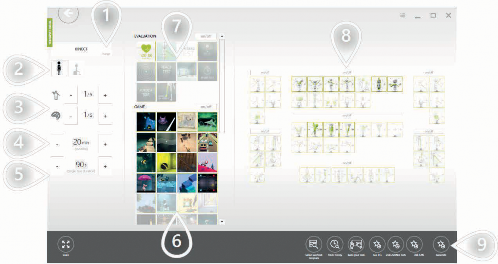
Figure 42. Generate workout
Select device
Filter control modes (standing and/or sitting)
Set suggested physical and cognitive difficulty. Based on those settings system suggests adequate therapeutic tasks and control modes.
Set workout's duration
Set duration for each therapeutic task
Based on the chosen physical and cognitive difficulty - there are some therapeutic tasks preselected. You can modify the list manually.
Evaluations are not added to the workout automatically. Please click on the evaluations you'd like to have included in the workout.
Based on the chosen physical and cognitive difficulty - there are some control modes preselected. You can modify the list manually. The greater the weight is - the more times it will be used.
Click to proceed
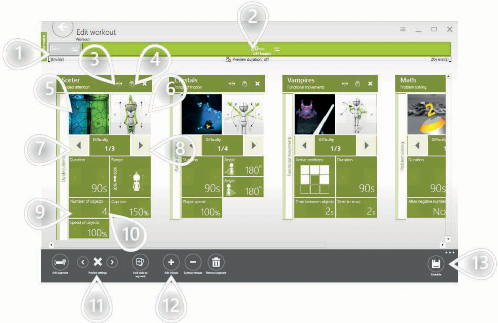
Figure 43. Edit workout
Therapeutic tasks in the workout are grouped by their type. All evaluations are placed in a separate evaluation segment where all tasks are executed only once.
The normal segment has duration assigned and the tasks it contains are executed one after another till the time is over.
Move the task to another position
Clone the task
Replace the task
Replace the control mode
Make task easier
Make task harder
Previous parameter preset
Next parameter preset
Decide whether fullscreen instruction shall be visible for the patient before each therapeutic task
Set workout's duration
Click to proceed
Start copy of the most recent workout
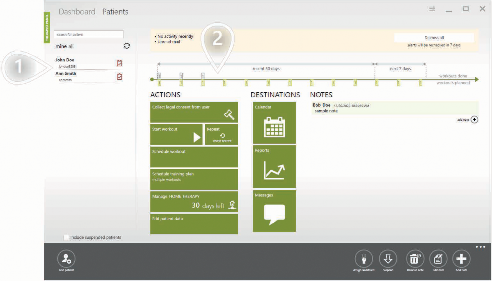
Figure 44. Patients overview
Select a patient
Click to proceed
If you have only one patient station this view will not appear.
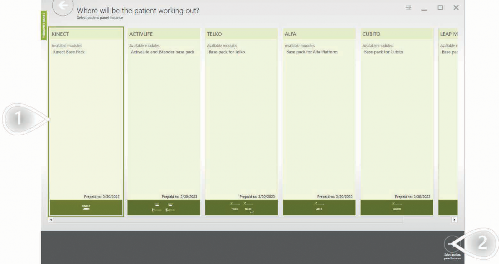
Figure 45. Overview of all available patient stations
Select a patient station
Click to proceed
This view shows the workout template that the patient performed on his previous visit.
You can modify it before starting.
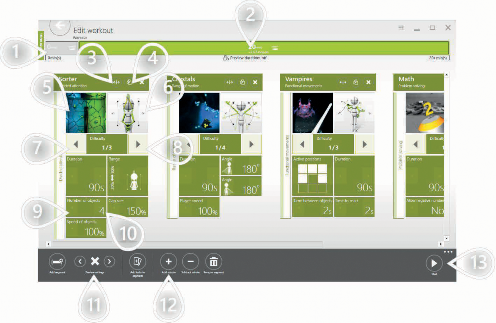
Figure 46. Edit workout
Therapeutic tasks in the workout are grouped by their type. All evaluations are placed in a separate evaluation segment where all tasks are executed only once.
The normal segment has duration assigned and the tasks it contains are executed one after another till the time is over.
Move the task to another position
Clone the task
Replace the task
Replace the control mode
Make task easier
Make task harder
Previous parameter preset
Next parameter preset
Decide whether fullscreen instruction shall be visible for the patient before each therapeutic task
Set workout's duration
Click to proceed
Schedule workout
As it was described before, you can prepare a workout template and then immediately launch it for the patient. Sometimes, however, it would be a good idea to make workouts in advance, and when the patient visits you, you have the therapy already prepared. It can be accomplished by scheduling workouts in the patient's calendar. This approach is also very useful when your patient uses home therapy. The workout can then be started at any time of the day, so it is comfortable for the patient.
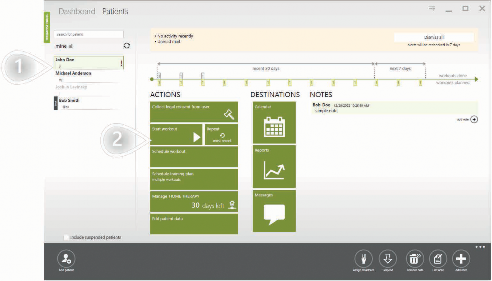
Figure 47. Patients overview
Select a patient
Click to proceed
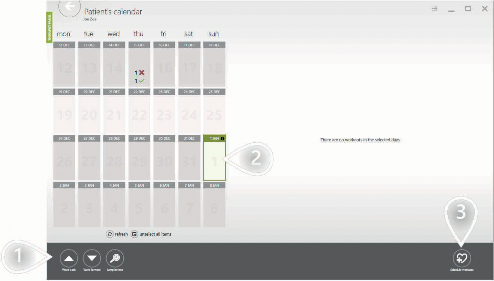
Figure 48. Patient’s calendar
The buttons help you navigate through the calendar
Select one or more days. Use the [Ctrl] key to select multiple days.
Click to proceed
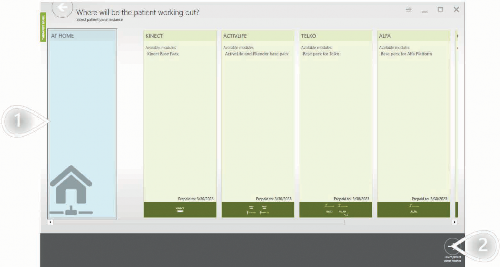
Figure 49. Overview of all available patient stations
Select a patient station
Click to proceed
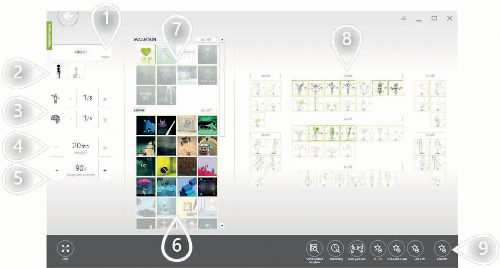
Figure 50. Generate workout
Select device
Filter control modes (standing and/or sitting)
Set suggested physical and cognitive difficulty.
Based on those settings system suggests adequate therapeutic tasks and control modes.
Set workout's duration
Set duration for each therapeutic task
Based on the chosen physical and cognitive difficulty - there are some therapeutic tasks preselected. You can modify the list manually.
Evaluations are not added to the workout automatically.
Please click on the evaluations you'd like to have included in the workout.
Based on the chosen physical and cognitive difficulty - there are some control modes preselected. You can modify the list manually. The greater the weight is - the more times it will be used.
Click to proceed
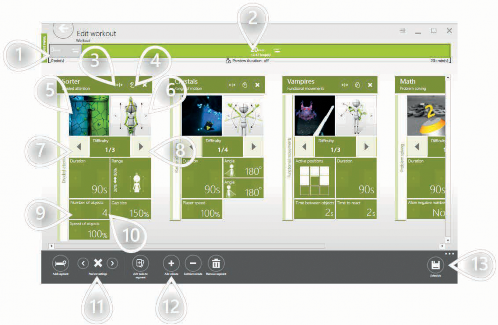
Figure 51. Edit workout
Therapeutic tasks in the workout are grouped by their type. All evaluations are placed in a separate evaluation segment where all tasks are executed only once.
The normal segment has duration assigned and the tasks it contains are executed one after another till the time is over.
Move the task to another position
Clone the task
Replace the task
Replace the control mode
Make task easier
Make task harder
Previous parameter preset
Next parameter preset
Decide whether fullscreen instruction shall be visible for the patient before each therapeutic task
Set workout's duration
Click to proceed
Start previously scheduled workout
The scheduling function is normally used to prepare workouts that your patient will start manually in the patient panel without having you around. It is, however, possible to start a previously scheduled workout directly from the therapist panel.
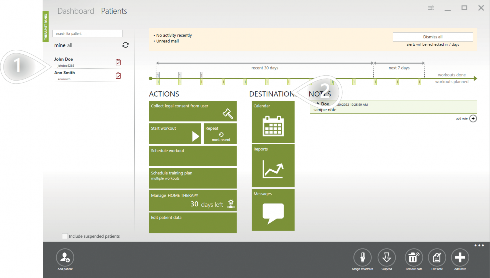
Select a patient
Click to proceed
Figure 52. Patients overview
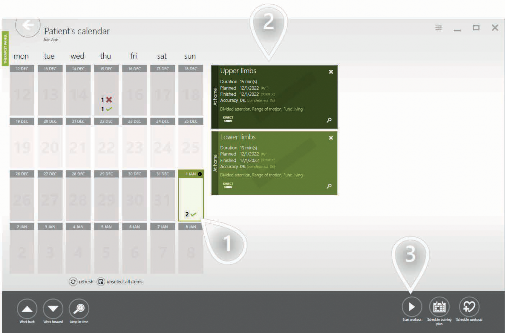
Select a day
Select a workout
Click to proceed
Figure 53. Patient’s calendar
If you have only one patient station this view will not appear.
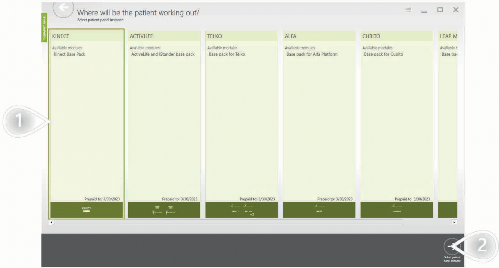
Figure 54. Overview of all available patient stations
Select a patient station
Click to proceed
[7B7] Scenarios: Training room
What is the training room?
The training room is used to deliver real-time communication between patient panels and therapist panels working in the same network. It allows you to have real-time insight into the results collected while your patients exercise. It is also used when you need to adjust therapy parameters without stopping the workout.
See patients’ performance on all patient stations
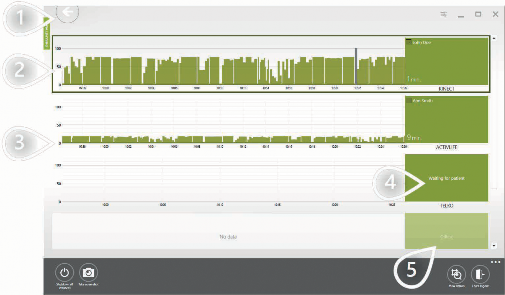
Figure 55. Training room – overview of all patient stations at the same time
Make sure appropriate tab is selected
This patient is doing quite well. We see average accuracy around 70% what means that the therapy is well-tailored.
Here we can see average accuracy less than 25% what means that the parameters are too difficult for the patient
This patient station is waiting for a patient - nobody is logged in currently
This patient station is currently offline
Make currently running task easier for the patient
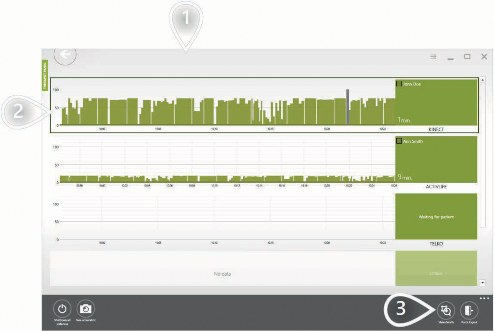
Figure 56. Training room – select a patient’s station
Make sure appropriate tab is selected
Select the patient station where the patient is exercising
Click to proceed
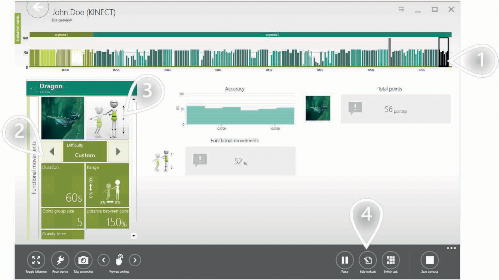
Figure 57. Edit the currently running task at the selected patient station
Make sure the currenlty running therapeutic task is selected
Change level or single parameters to adjust the therapeutic task accordingly to the patient's needs. Changes are automatically sent to the patient station.
Change the control mode
Change the general structure of the workout, change workout's duration, parameters, etc.
Accept or reject result from currently running evaluation task
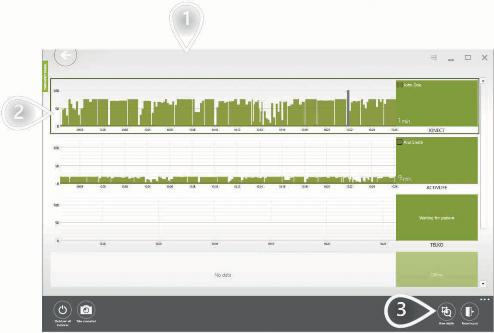
Figure 58. Training room – select a patient’s station
Make sure appropriate tab is selected
Select the patient station where the patient is exercising
Click to proceed
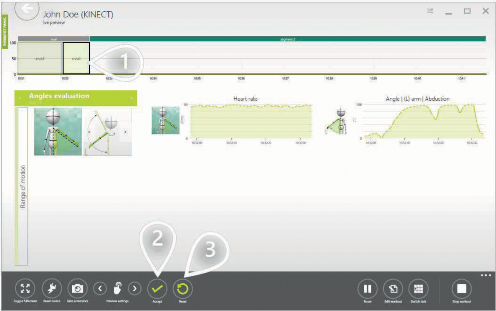
Figure 59. Accept or reject the result from currently running task at the selected patient station
Make sure the currenlty running therapeutic task is selected
If the evaluation has been performed properly - you can accept the result
In case of any problem while performing the evaluation - you can reset it. The system will discard the result and the test will be started over.
Change currently running therapeutic task on a given patient station
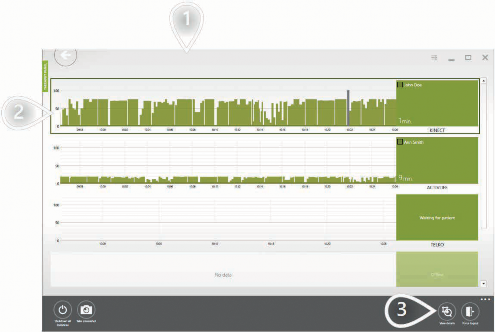
Figure 60. Training room – select a patient’s station
Make sure appropriate tab is selected
Select the patient station where the patient is exercising
Click to proceed
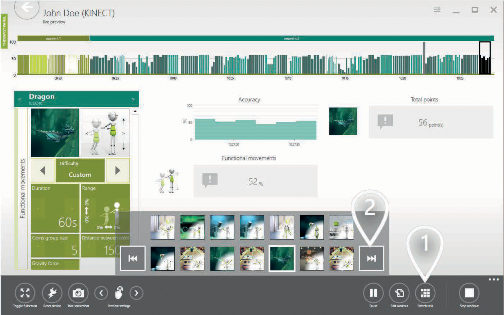
Figure 61. Change currently running task at the selected patient station
Open list of available therapeutic tasks
Click to jump to the next therapeutic task in the segment
Extend workout’s duration
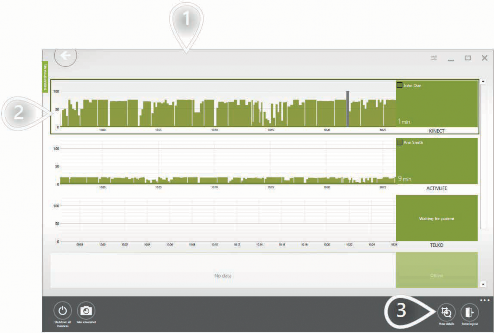
Figure 62. Training room – select a patient’s station
Make sure appropriate tab is selected
Select the patient station where the patient is exercising
Click to proceed
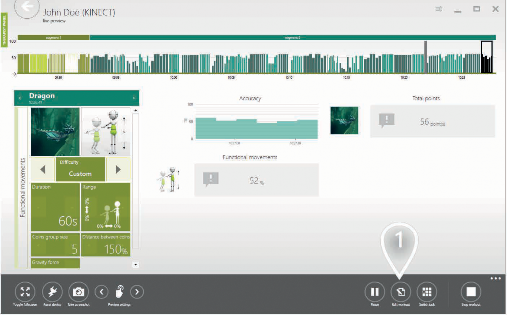
Figure 63. Click on ‘Edit workout’ to edit currently running workout
1 Click to proceed
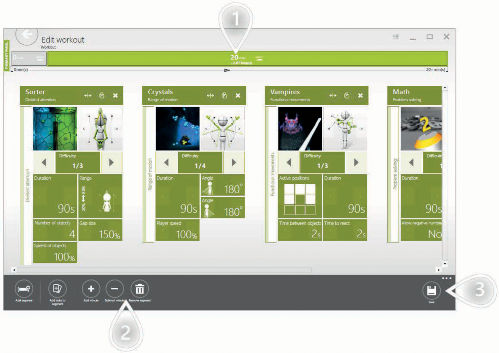
Figure 64. Edit currently running workout’s duration
Actual duration of the workout segment
Adjust the duration
Click to proceed
[7B8] Scenarios: Reports
Show report from a single workout session
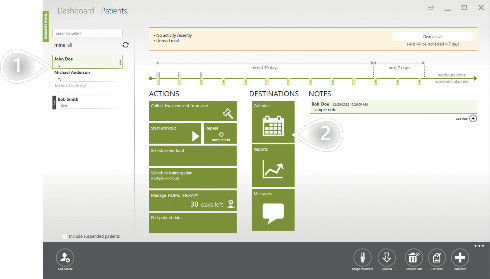
Select a patient
Click to proceed
Figure 65. Patients overview
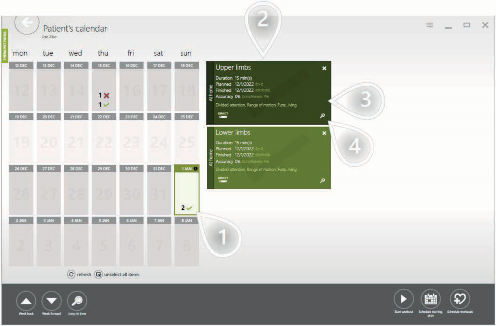
Select a day
List of workouts
Select a workout
Click to proceed
Figure 66. Patient’s calendar
The view below is an interactive report. You can go through all the therapeutic tasks performed in that workout. For each therapeutic task, you can see the collection of parameters used while performing the task as well as the results gathered.
You can print a report presenting a single therapeutic task on a single page or the whole workout report on several pages.
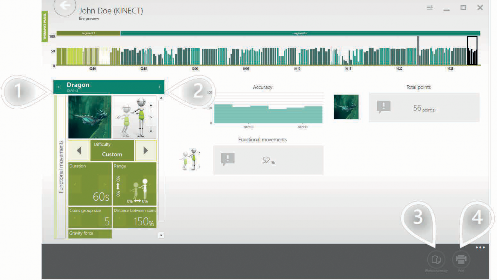
Figure 67. Interactive report for all tasks performed in that workout
Go to previous task
Go to next task
Print report for the whole workout session
Print report for selected therapeutic task
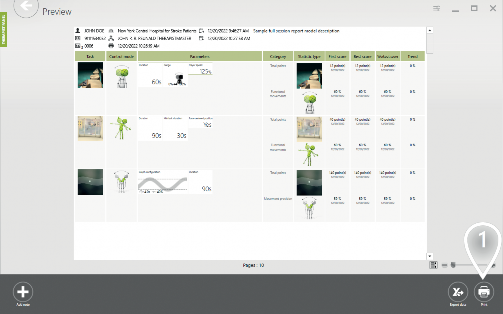
Figure 68. Preview of generated report
1 Click to proceed
Show long-term reports to present patient’s progress
To correctly assess your patients' progress it is crucial to compare their results collected in a series of workouts.
Such comparisons are prepared automatically in VAST.Rehab
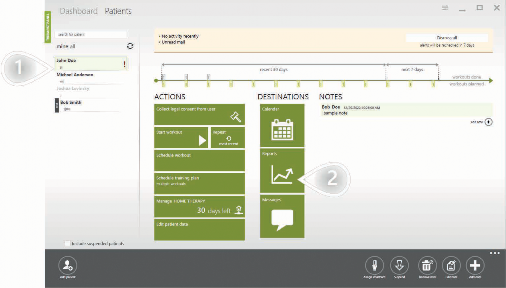
Figure 69. Patients overview
Select a patient
Click to proceed
The view below presents the report categories possible to prepare in VAST.Rehab system. Each therapeutic task is assigned to one of those categories. When a workout is performed by your patient the results are automatically assigned to appropriate categories. When a category contains at least 1 result it changes its color to green. You can click a green category to see more details.
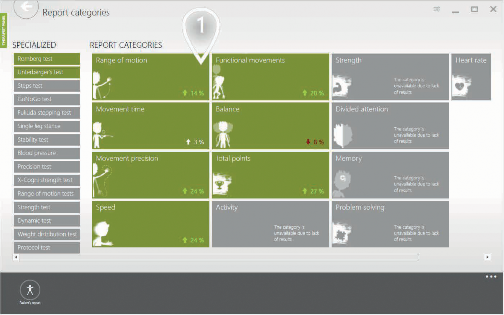
Figure 70. Report categories
1 Click to proceed
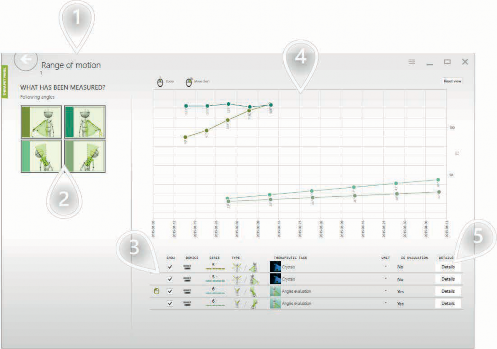
Figure 71. Example for report category ‘range of motion”
Selected category
List of angles that have been measured for the selected patient
Series of data possible to plot on the chart. Each series represents the measurements taken in the same conditions (the same device, the same parameters, the same therapeutic task, etc.)
On the X-axis there are weeks of the therapy. Each point on the chart represents the maximal angle achieved by the patient in the corresponding week of therapy.
More details about the series of data
The chart below compares the results achieved using the left and the right hand.
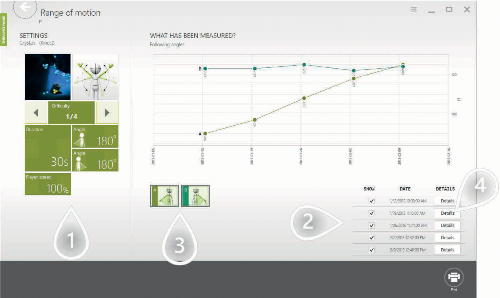
Figure 72. Example for more detailed data in report category ‘range of motion’
The parameters that were used while collecting the data
The dates when the measurements have been taken
Series of data possible to plot on the chart
Click to see the result in the context of the whole workout session
Show simple report ready to discuss with your patient
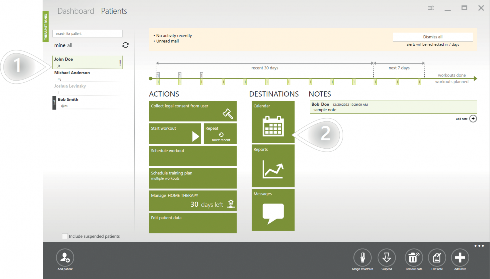
Figure 73. Patients overview
Select a patient
Click to proceed
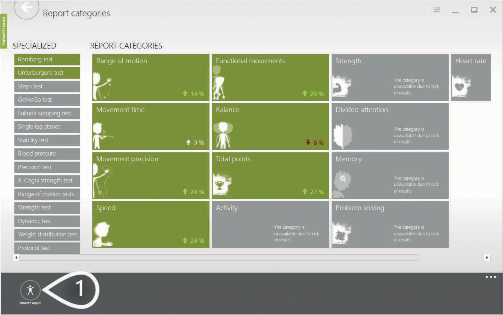
Figure 74. Report categories
1 Click to proceed
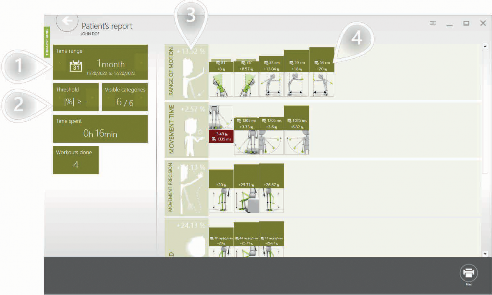
Select time frame
Figure 75. Patient’s report
Select progress treshold. Result will be displayed only if it is far enough from 0 (when progress is very small result will be hidden).
Average progress achieved in all Control Modes in the category
Progress achieved in the given Control Mode
[7B9] Scenarios: Research
What is a research and when to use it?
If you plan to do research, VAST.Rehab will make your daily work easier. Use the research feature when you need to:
Compare progress done by several groups of patients performing the same workout template
Compare the results and progress of several patients performing the same workout template
Creating research
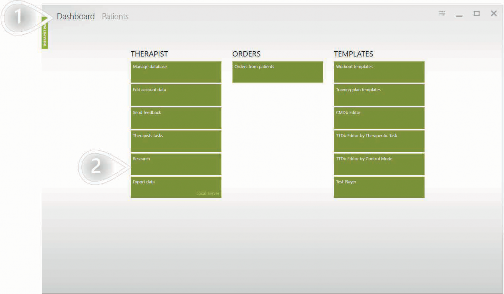
Figure 76. Dashboard overview
Make sure appropriate tab is selected
Click to proceed
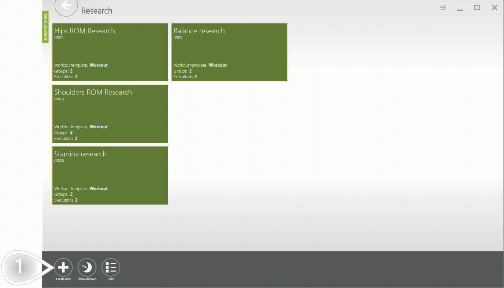
Figure 77. Research overview
1 Click to proceed
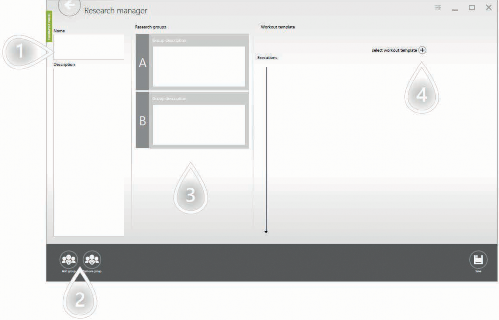
Figure 78. Create research in research manager form
Fill the 'Name' and 'Description' fields
Add and remove research groups
Here are the research groups. You can add some description for each of them. Patients will be added to groups later - when you finish designing and save the research.
Click to set the workout template that will be used in the research
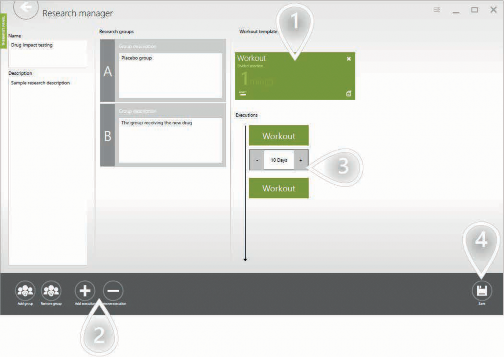
Figure 79. Create research in research manager form
Selected workout template
Set how many times the workout template will be performed by each patient
Set the interval between executions of the workout template
Click to proceed
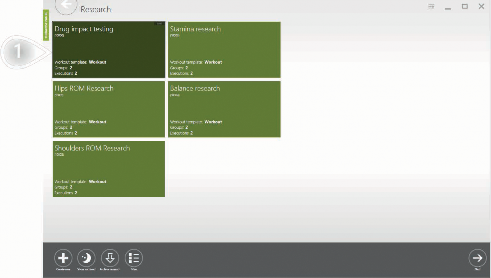
Figure 80. Research overview with new created research
1 The created element
Add a patient to your research’s group
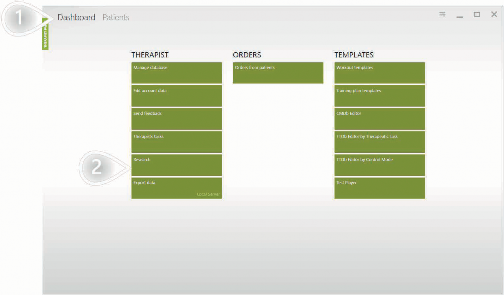
Figure 81. Dashboard overview
Make sure appropriate tab is selected
Click to proceed
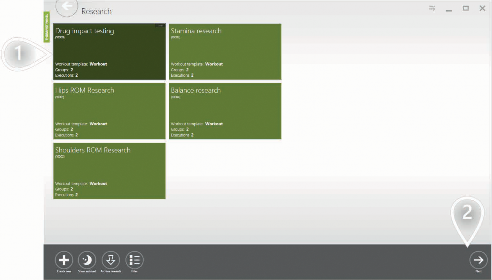
Figure 82. Research overview
Select an element
Click to proceed
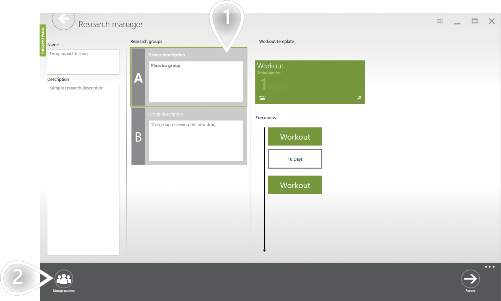
Figure 83. Research manager form
Select one of the groups
Click to proceed
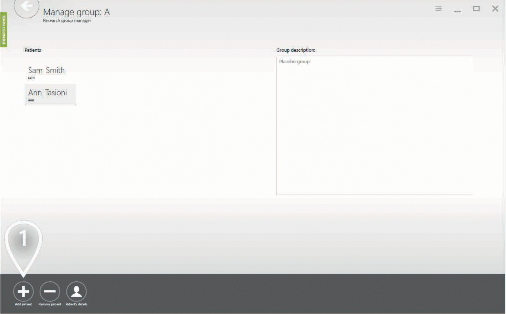
Figure 84. Selected research group
1 Click to proceed
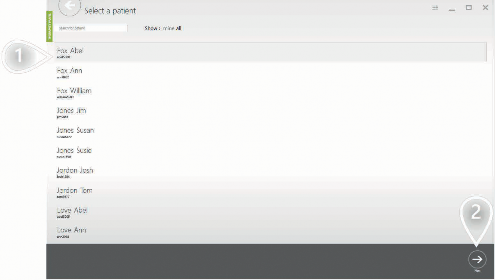
Figure 85. Select / Add a patient to research group
Select a patient
Click to proceed
Start first research workout for your patient
When you add a patient to one of the research groups there is an automatically generated task for you to do the first workout with your patient. The first task has no due date - it can be started at any time.
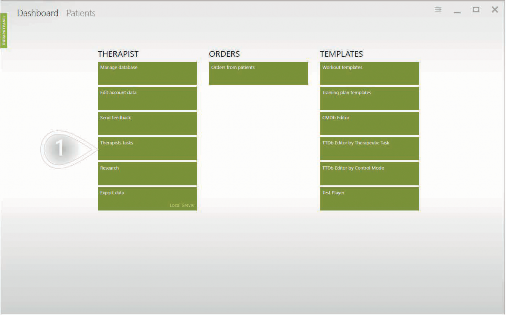
Figure 86. Dashboard overview
1 Click to proceed
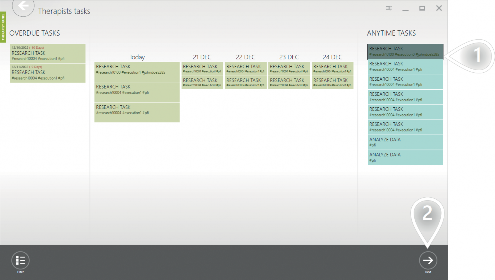
Figure 87. Select research task in therapists task overview
Select the research task tagged with your patient's login.
Click to proceed
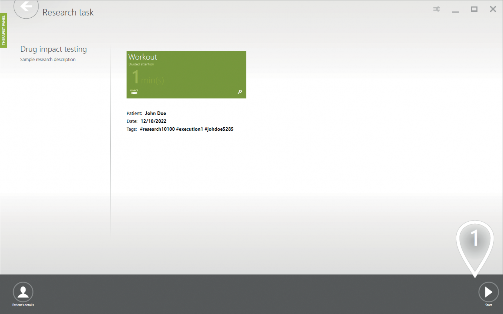
Figure 88. Selected research task in detail
1 Click to proceed
If you have only one patient station this view will not appear.
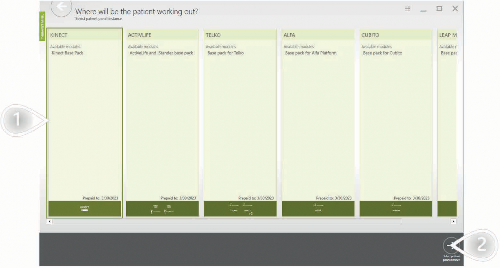
Figure 89. Overview of all available patient stations
Select a patient station
Click and do the workout session with your patient as you normally do
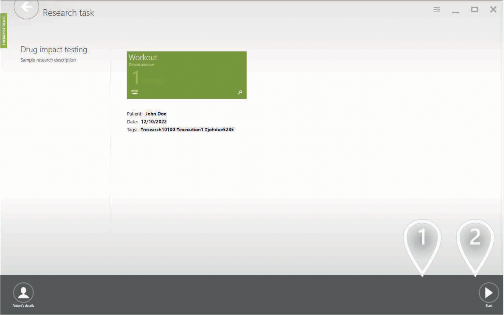
Figure 90. Repeat execution of this workout or mark the task as completed
If you need you can repeat execution of this workout with your patient
Mark the task as completed when the workout is finished successfully
Start follow up research workout for your patient
When your research contains more than one execution - you need to decide how many days shall pass between those executions. When the first execution is done – the system automatically schedules a task for you to perform the follow-up execution at the correct date.
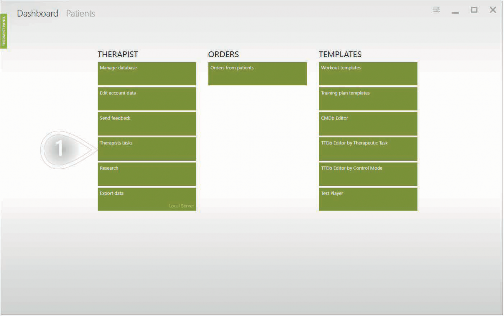
Figure 91. Dashboard overview
1 Click to proceed
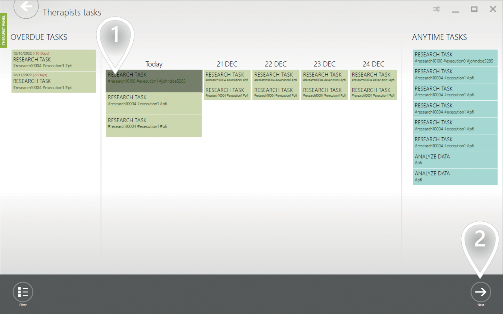
Figure 92. Overview therapists tasks
Select the scheduled for today research task tagged with your patient's login
Click to proceed
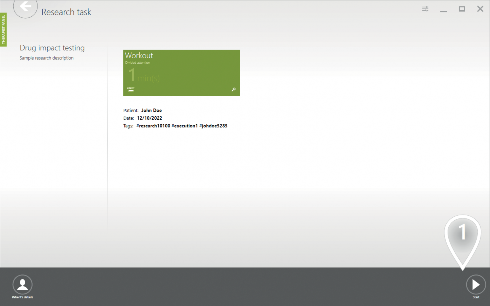
Figure 93. Selected research task in detail
1 Click to proceed
If you have only one patient station this view will not appear
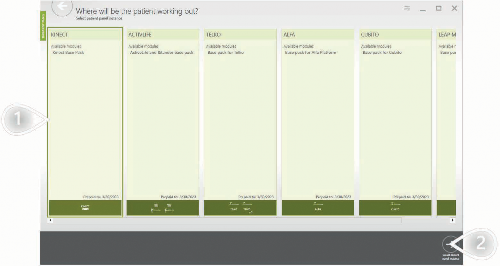
Figure 94. Overview of all available patient stations
Select a patient station
Click and do the workout session with your patient as you normally do
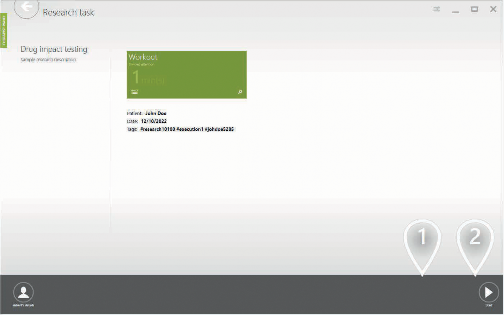
Figure 95. Repeat execution of this workout or mark the task as completed
If you need you can repeat execution of this workout with your patient
Mark the task as completed when the workout is finished successfully
Generate research reports
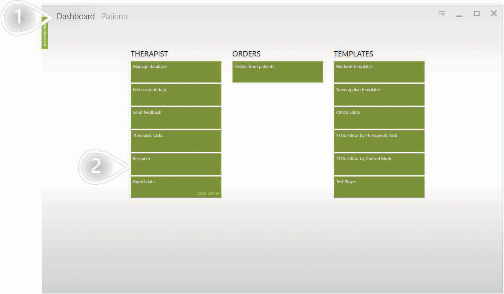
Figure 96. Dashboard overview
Make sure appropriate tab is selected
Click to proceed
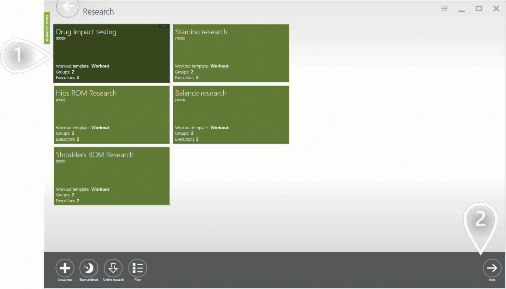
Figure 97. Researches overview
Select an element
Click to proceed
The data provided below will help you decide which patients shall be taken under consideration while generating the report. This sample research is designed to have 2 executions. The second execution shall be performed 10 days after the first. The first execution is marked as OK for all patients because it can be performed at any time, so it can't be performed too early nor too late. When it comes to the column describing the second execution you can see the number of days passed between those executions.
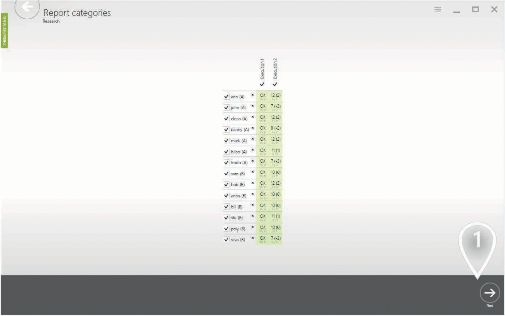
Figure 98. Research report categories listed per patient
1 Click to proceed
Select a category of data.
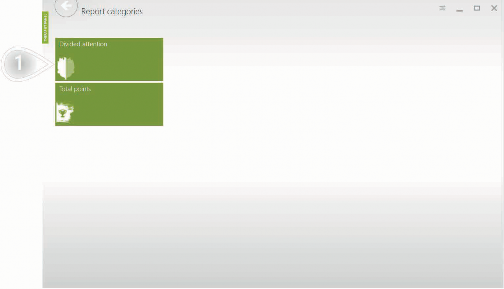
Figure 99. Several research report categories
1 Click to proceed
The progress achieved by group "B" (taking the new drug) is much higher than progress achieved by group "A" (taking a placebo).
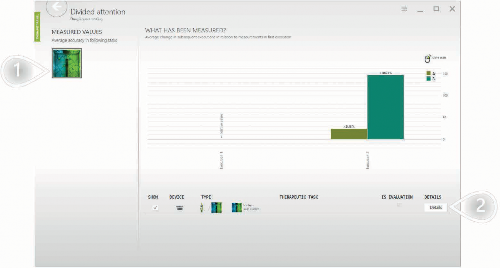
Figure 100. Detailed research report for example for category ‘divided attention’
Therapeutic task used to collect the data.
Click to go deeper into details
Use the 'relative mode' to see the percentage of improvement in the subsequent executions relatively to the first execution.
It's the average value achieved by patients in the given research group.
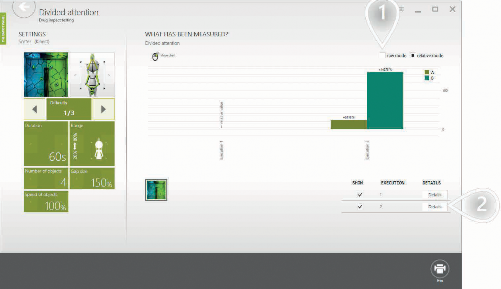
Figure 101. Detailed research report for example for category ‘divided attention’
Click to switch to 'raw mode'
Click to go deeper into details
Use the 'raw mode' to display real values (with units) achieved in the given research groups in the selected executions.
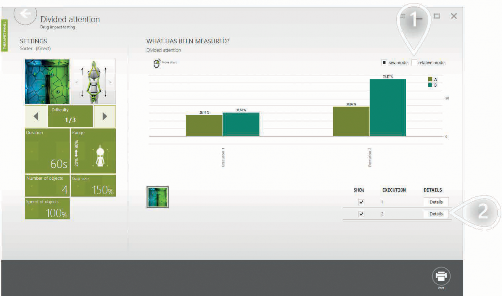
Figure 102. Detailed research report for example for category ‘divided attention’
Click to switch to 'relative mode'
Click to go deeper into details
The screen below presents the results achieved by each patient in the second execution of the research workout template relatively to the first execution.
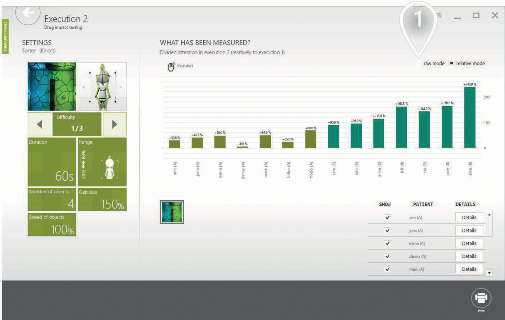
Figure 103. Detailed research report for each patient (comparing first and second execution) ‘relative mode’
1 Click to switch to 'raw mode'
The screen below presents the results achieved by each patient in the second execution of the research workout template.
It is raw data with the given unit.
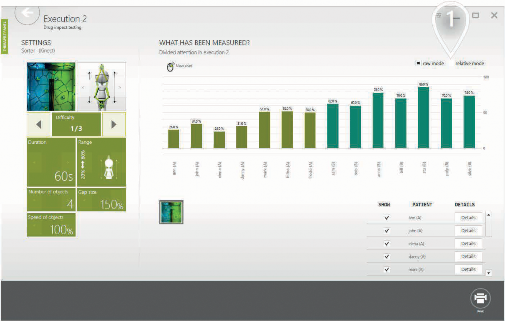
Figure 104. Detailed research report for each patient (comparing first and second execution) ‘raw mode’
1 Click to switch to 'relative mode'
[7B10] Tips
Adapt user Interface
You can scale UI items to match your personal needs and to take advantage of your screen size.
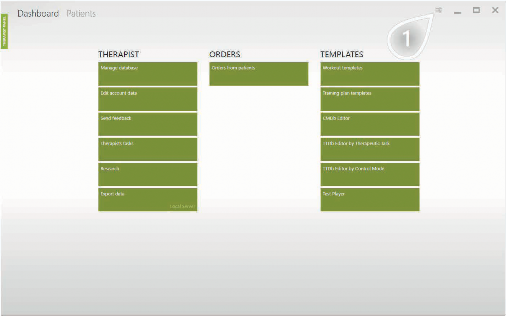
Figure 105. Dashboard overview
1 Click to open settings
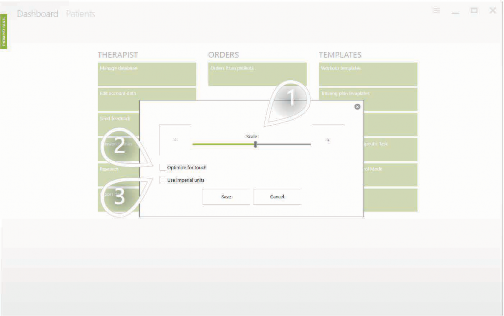
Adjust UI scale
Figure 106. Settings screen
If you're using a touch screen, checking this box makes using Therapist Panel more comfortable
If you want to use imperial units, check this box. If you want to use the metric system, leave it unchecked.
Turn off all available devices
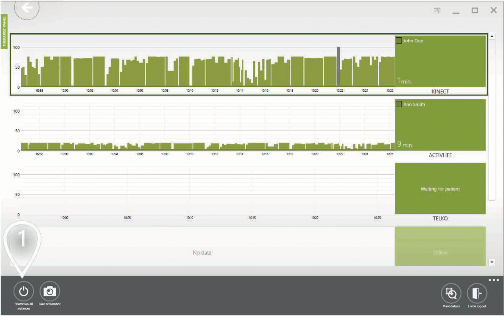
Figure 107. Training room overview
1 Click to turn off all computers running VAST.Rehab Patient Panel in your network
Data export
Data export described below is useful when you need to process the VAST.Rehab data in external software. You'll receive an XML file with the results from all the Workout sessions performed within the chosen time frame.
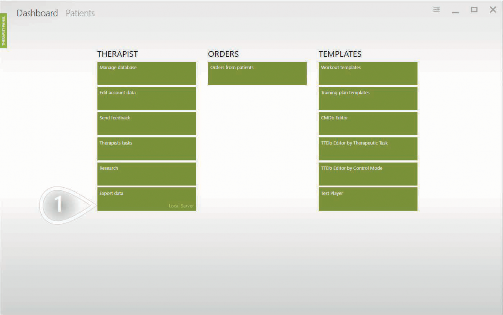
Figure 108. Dashboard overview
1 Click to proceed
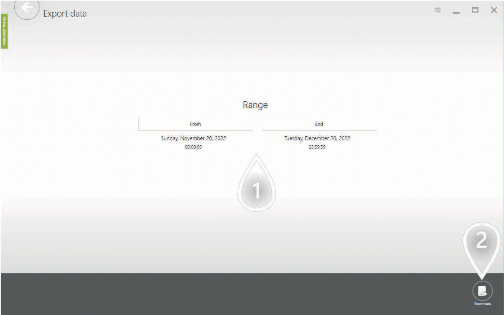
Figure 109. Export data settings
Select the timeframe
Click to proceed
Display fullscreen instructions for your patient
The fullscreen instructions are useful when you start working with a new patient.
It gives the patient a while to get familiarized with the prescribed movement pattern and to read the instruction carefully.
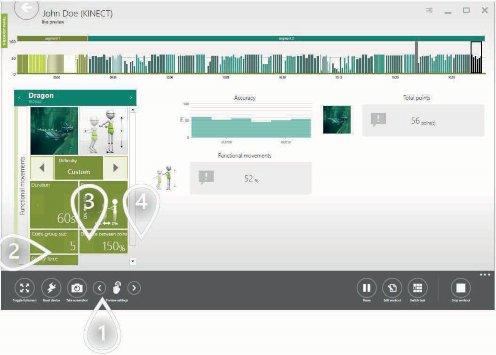
Figure 110. Live preview workout for selected patient
Open available options
Choose to have the fullscreen instructions turned off
Choose to have each Therapeutic Task preceded by 20 seconds of fullscreen instruction
Choose to have each Therapeutic Task preceded by fullscreen instruction that lasts till it is manually dismissed from Therapist Panel
When fullscreen instruction is turned on - patients will see the following screen.
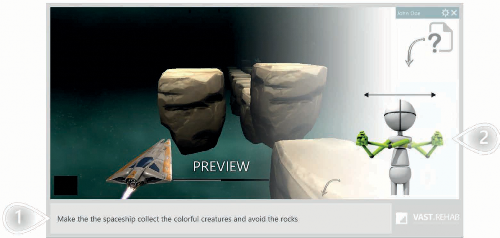
Figure 111. Preview fullscreen instruction for patients
Text instruction
Required movement pattern
[7C] Patient Panel
The patient panel is the gamificated part of the system right in front of the treadmill on a big TV screen, displaying the patient’s games and results.

Figure 112. Logo icon software patient panel
[7C1] Introduction
What is the patient panel used for?
VAST.Rehab Patient Panel is the gamified part of the system. It is designed to keep the patient engaged while performing the exercises. Usually, the patient learns to use VAST.Rehab while working one to one with the therapist, and at the later stage, he will be able to perform preplanned sessions by himself without his therapist's supervision (e.g. at home). Each of the therapeutic tasks offers lots of configuration options. That's why - while exercising - the patient always has a small picture presenting the movement pattern that he is expected to perform in the currently running task.
How do I install the patient panel?
All applications of VAST.Rehab are available in Microsoft Store. You can simply search for "VAST.Rehab" and the list of available apps will be displayed. You can also paste the following URL to your web browser:
- https://www.microsoft.com/store/apps/9N9MV3R0RMFF
[7C2] Scenarios for patients
How to exercise?
Therapy with VAST.Rehab requires physical activity to interact with elements in virtual world presented on your screen.
When Workout is started you will see elements presented below
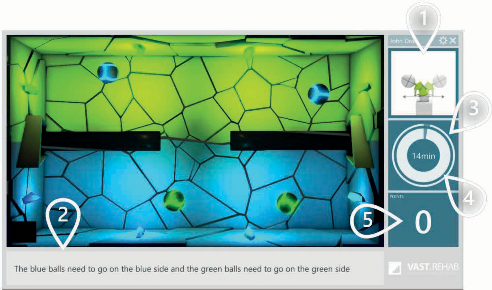
Figure 113. Virtual world presented on screen when workout is started
Movement pattern you are expected to perform
Instruction for currently running Therapeutic Task
Outer circle presents time left in the Workout
Inner circle presents time left in the current Therapeutic Task
Number of points collected
Sign in manually
You need to have your login and password in order to use Patient Panel. You shall receive them from your therapist.
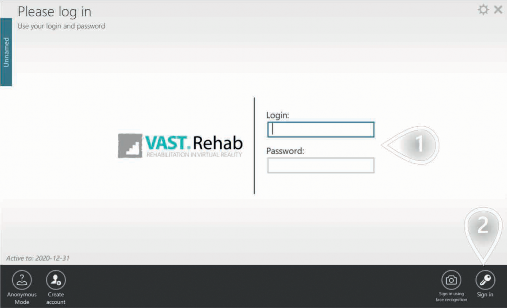
Figure 114. Login screen Patient Panel
Provide your login and password
Click to proceed
When authorized you'll see Patient Panel's main menu screen. It is described below.
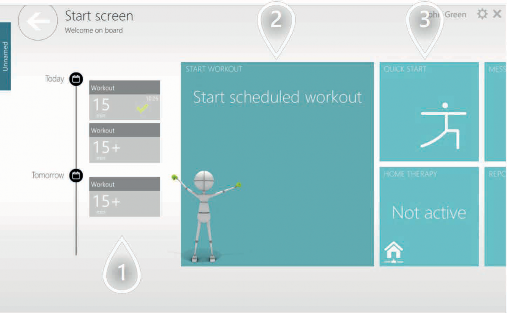
Figure 115. Start screen Patient Panel
Timeline of Workouts scheduled in your calendar
Click to start Workout scheduled for today
Click to generate a Workout without Therapist Panel
Manually start workout prepared by your therapist
When your therapist assigns you a Workout that can be started today – you can start it manually as described below.
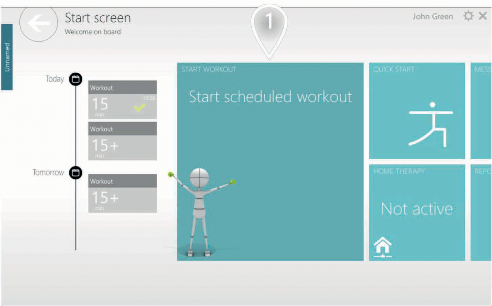
Figure 116. Start screen Patient Panel
1 Click to start Workout scheduled for today
Here you can see a list of Therapeutic Task your Workout contains
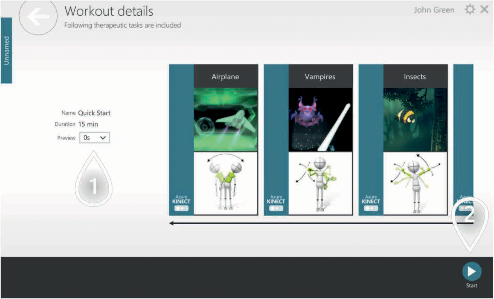
Figure 117. Workout details – list of therapeutic tasks
Duration of fullscreen instructions before each Therapeutic Task
Click to proceed
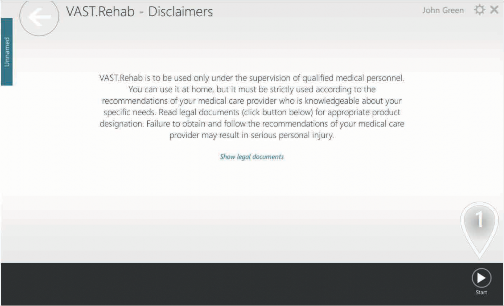
Figure 118. VAST.Rehab disclaimer before starting workout
1 Click to proceed
Edit your personal data
If you need to update your personal data (e.g. your name) you can do it manually as described below.
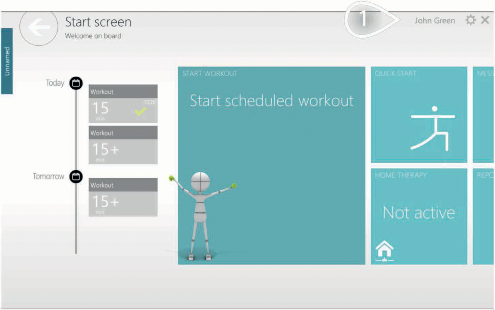
Figure 119. Start screen Patient Panel
1 Click to navigate
Modify data in the form below.
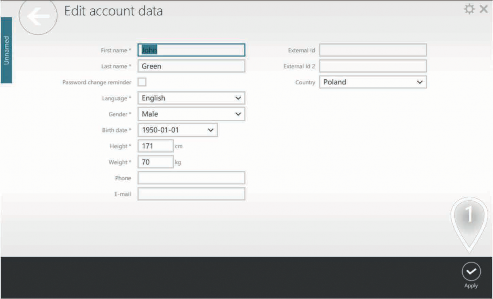
Figure 120. Edit account data
1 Click to proceed
Write message to your therapist
If you need to contact your therapist (e.g. to ask some questions) you can do it as described below.
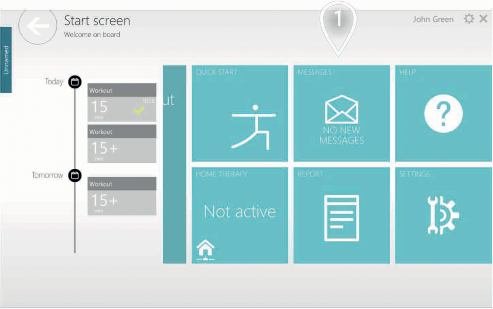
Figure 121. Start screen Patient Panel
1 Click to navigate
Type your message in the form below.
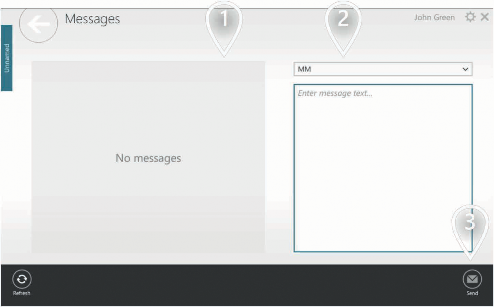
Figure 122. Messages form
History of your communication
Select institution you want send the message to
Click to proceed
[7C3] Scenarios for therapists
Convert your license from home to institutional
When an institution (e.g. hospital) decides to use VAST.Rehab it must decide how many Patient Stations (computers running Patient Panel) they need. Each Patient Station has then unique identifier and can have different modules assigned to it. Activation means assigning a specific Patient Station identifier to the computer.
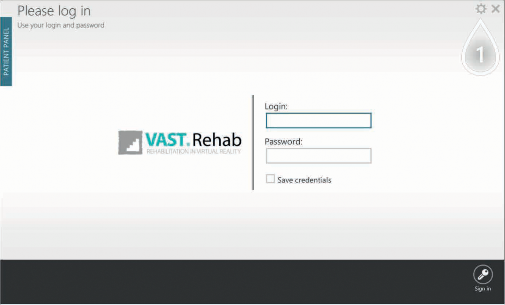
Figure 123. Login screen Patient Panel
1 Click to proceed
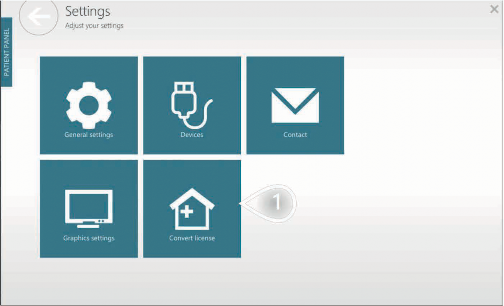
Figure 124. Settings screen
1 Click to proceed
Provide your VAST.Rehab Administrator account credentials to initialize activation.
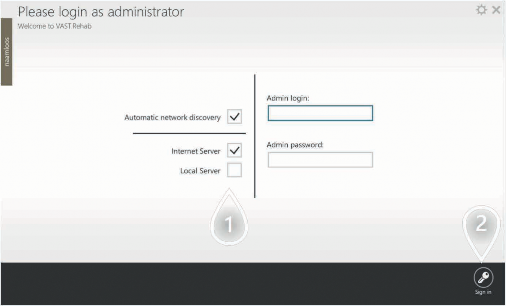
Figure 125. Login screen administrator
The default option is 'Internet Server'. In case your computers can't be connected to the Internet you will need to choose 'Local Server'.
When 'Local Server' is used you'll need to install additional software called 'VAST.Rehab Local Server' which needs a special USB dongle to work.
Click to proceed
Below you can see all the Patient Stations that are available on your VAST.Rehab Administrator account.
Each Patient Station displays list of modules that are assigned to it.
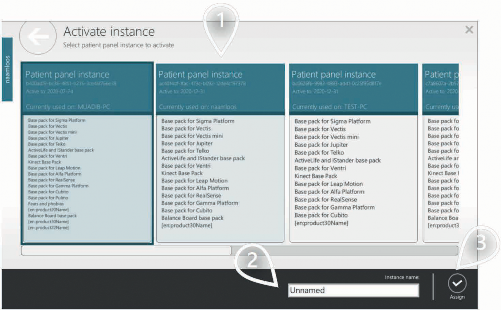
Figure 126. Select available Patient Panel instance to activate
Select Patient Station you want to activate
Choose name for this Patient Stations when listed in your Therapist Panel
Click to proceed
Create new patient
Although you are normally expected to use Therapist Panel for managing patients database – you can create patient's account directly in Patient Panel.
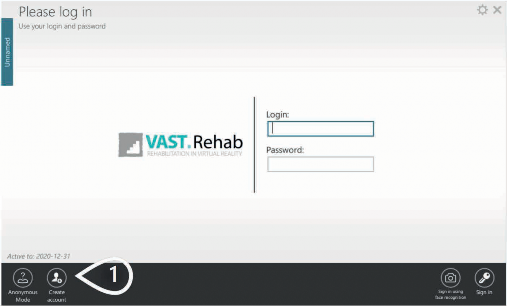
Figure 127. Login screen Patient Panel
1 Click to navigate
Fill the form
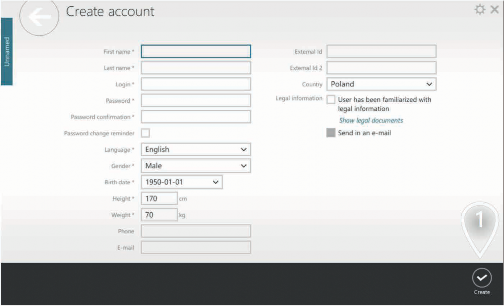
Figure 128. Create account form
1 Click to proceed
Generate a quick workout for patient
Although you are normally expected to use Therapist Panel to build Workouts for your patients – you can generate a Workout directly in Patient Panel as described below.
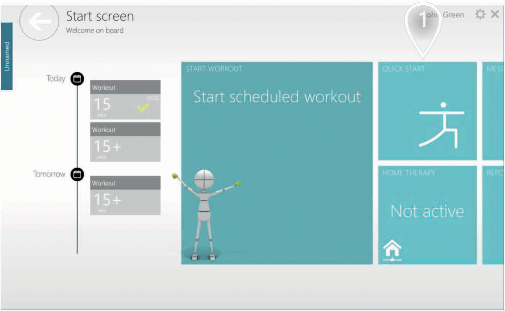
Figure 129. Start screen Patient Panel
1 Click to generate a Workout without Therapist Panel
Adjust settings according to your needs.
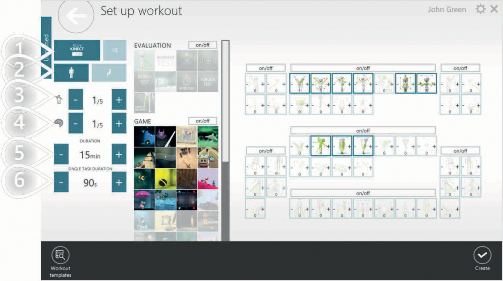
Select device
Figure 130. Set up workout
Filter control modes (standing and/or sitting)
Select physical difficulty
Select cognitive difficulty
Set workout's duration
Set duration for each therapeutic task
Based on your decisions in previous step system suggested some Therapeutic Tasks and Control Modes to be used.
The disabled elements will not be used in the Workout by default, but you can activate them manually.
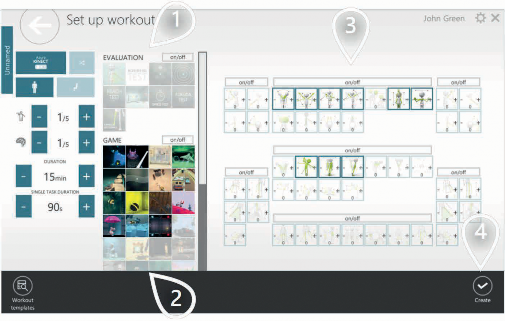
Figure 131. Set up workout
Select evaluations you want to be performed
Select gamified Therapeutic Tasks you want to be performed
Select Control Modes (movement patterns) you want to be performed.
The larger the number you choose, the larger the share of the given Control Mode will be.
Click when you are happy with your settings
Here you can see list of Therapeutic Task your Workout contains
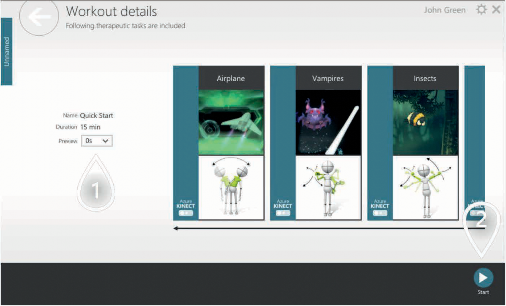
Figure 132. Workout details – list of therapeutic tasks
Duration of fullscreen instructions before each Therapeutic Task
Click to proceed
Start multiplayer workout
You can use VAST.Rehab to start Workout for 2 patients on the same Patient Station. Depending on the Therapeutic Task they will then play against each other or in cooperation. Please note that when multiplayer is used no statistics are collected. In order to start it - please follow the process described below.
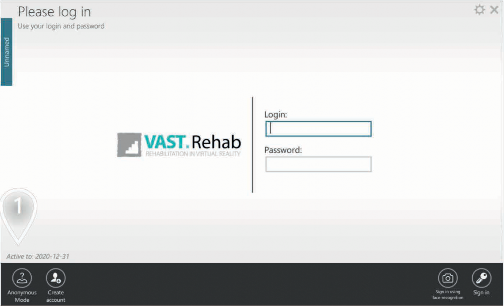
Figure 133. Login screen Patient Panel
1 Click to start anonymous Workout (single or multiplayer)
Adjust settings according to your needs.
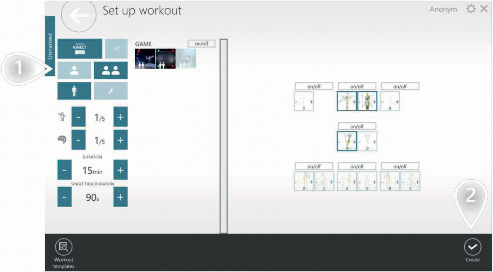
Figure 134. Set up workout
Select single or multiplayer mode
Click to proceed
Generate report for patient
Objective data is an important element that helps keep patient motivated. You can generate a simply report to discuss with your patient directly in Patient Panel. You can observe in which categories patient is getting better and in which is getting worse. In order to do it please follow the process described below.
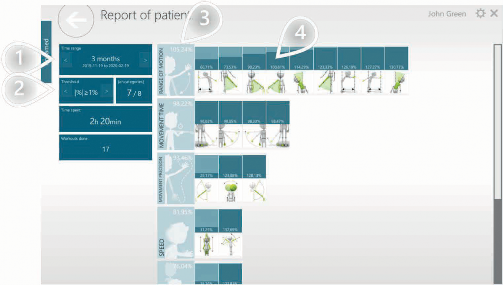
Figure 135. Generate simple report of patient
Select time frame
Select progress threshold. Result will be displayed only if it is far enough from 0 (when progress is very small result will be hidden).
Average progress achieved in all Control Modes in the category
Progress achieved in the given Control Mode
[7C4] Settings
How to adjust settings?
Patient Panel has a dedicated settings view that lets you tailor the application according to your needs.
In order to change some settings please follow the process described below.
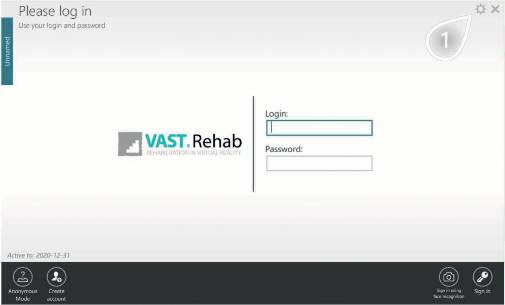
Figure 136. Login screen Patient Panel
1 Click to navigate
Settings are divided into several groups.
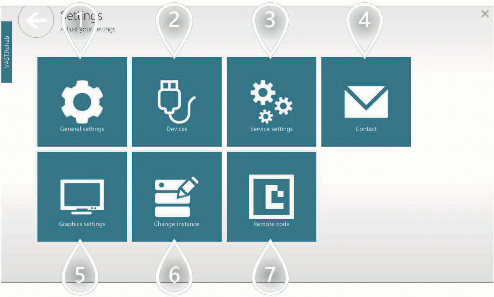
Figure 137. Settings screen
Set language, unit system, active monitor devices, ect.
Manage devices connected to this Patient Station
Password protected options available for VAST.Rehab technicians only
Contact with VAST.Rehab producer
Set screen where application shall start and screen resolution
Change license activated on this Patient Station
Choose which camera shall be used to look for special code that can be used to perform basic actions during Workout
[8] VAST.Rehab – Troubleshooting
[8A1] Via Therapist Panel
Error logs
Sometimes software may encounter a situation in which it can't proceed with its regular flow. Such a situation might happen when there is a problem with WI-FI or internet connection, a connection between devices or some other unexpected conditions occurred.
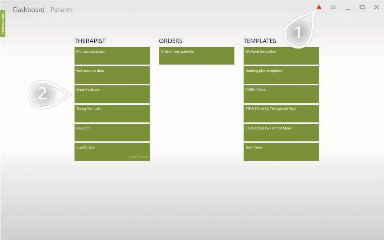
Figure 138. Dashboard overview with error symbol
If the system encounters an error this red triangle appears. By clicking it you can obtain more information.
You can also use the 'Send feedback' button to navigate to the page that allows you to send a log file to the technical support.
Here is detailed information about errors that have occurred since the application was launched.
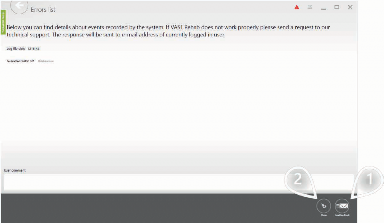
Figure 139. Errors list
With the 'Send feedback' button you can send a log file to the technical support.
After you send logs you can remove the red triangle from above using the 'Clean' button.
[8A2] Via Patient Panel
What to do when a problem occurs?
If for any reason Patient Panel is crashing please follow the process described below to send a description of the problem to us.
The system will automatically add to your message additional information collected when application crashed - they will help us solve the problem you are encountering.
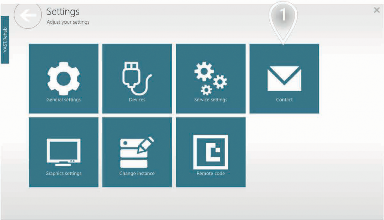
Figure 140. Settings screen
1 Contact with VAST.Rehab producer
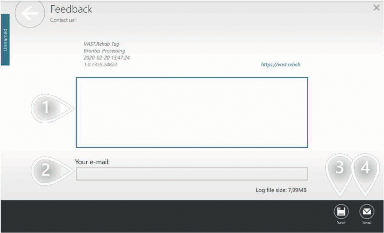
Figure 141. Feedback form
Describe your problem here
Type your contact details here
Click to save the log file on your desktop. You can send it manually to the producer.
Click to proceed
[9] Research / Literature
Cho, C., Hwang, W., Hwang, S., & Chung, Y. (2016). Treadmill training with virtual reality improves gait, balance, and muscle strength in children with cerebral palsy. The Tohoku journal of experimental medicine, 238(3), 213-218. doi: 10.1620/tjem.238.213. Link
Jung, J., Yu, J., & Kang, H. (2012). Effects of virtual reality treadmill training on balance and balance self-efficacy in stroke patients with a history of falling. Journal of physical therapy science, 24(11), 1133-1136. Link
Mirelman, A., Rochester, L., Reelick, M., Nieuwhof, F., Pelosin, E., Abbruzzese, G., ... & Hausdorff, J. M. (2013). V-TIME: a treadmill training program augmented by virtual reality to decrease fall risk in older adults: study design of a randomized controlled trial. BMC neurology, 13, 1-12. doi:10.1186/1471-2377-13-15 Link
Peruzzi, A., Cereatti, A., Della Croce, U., & Mirelman, A. (2016). Effects of a virtual reality and treadmill training on gait of subjects with multiple sclerosis: a pilot study. Multiple sclerosis and related disorders, 5, 91-96. Link
Sloot, L. H., Van der Krogt, M. M., & Harlaar, J. (2014). Effects of adding a virtual reality environment to different modes of treadmill walking. Gait & posture, 39(3), 939-945. Link
Winter, C., Kern, F., Gall, D., Latoschik, M. E., Pauli, P., & Käthner, I. (2021). Immersive virtual reality during gait rehabilitation increases walking speed and motivation: a usability evaluation with healthy participants and patients with multiple sclerosis and stroke. Journal of neuroengineering and rehabilitation, 18(1), 68. Link
Yang, S., Hwang, W. H., Tsai, Y. C., Liu, F. K., Hsieh, L. F., & Chern, J. S. (2011). Improving balance skills in patients who had stroke through virtual reality treadmill training. American journal of physical medicine & rehabilitation, 90(12), 969-978.
doi: 10.1097/PHM.0b013e3182389fae Link
List of Figures
Figure 1. Various interactive games by VAST.Rehab 6
Figure 2. An example of how to set up and connect everything 13
Figure 3. Complete hardware setup recommended by h/p/cosmos 14
Figure 4. Login via therapist panel 16
Figure 5. Logo icon software therapist panel 18
Figure 6. Login via therapist panel 19
Figure 7. Dashboard overview 20
Figure 8. Manage therapist form 20
Figure 9. Create patient’s account – symbol ‘add patient’ 21
Figure 10. Create patient’s account – add & save information 21
Figure 11. Creating notes about your patient 22
Figure 12. Creating notes – enter note 22
Figure 13. Patient on the list with exclamation mark 23
Figure 14. Patients overview 23
Figure 15. Patient’s calendar 24
Figure 16. Suspend patient’s account 25
Figure 17. Suspended account appears grayed out 25
Figure 18. Choose button workout templates on dashboard overview 26
Figure 19. Workout templates overview 26
Figure 20. Create workout template by using generator 27
Figure 21. Edit workout 28
Figure 22. Rename workout 29
Figure 23. Choose button workout templates on dashboard overview 30
Figure 24. Overview workout templates 30
Figure 25. Generate workout template 31
Figure 26. Available devices overview 31
Figure 27. Add tasks to segment 32
Figure 28. Edit workout 33
Figure 29. Rename workout 34
Figure 30. Dashboard overview 35
Figure 31. Symbols for editing / removing workout templates 35
Figure 32. Training plan template planned for 4 weeks 36
Figure 33. Edit training plan 37
Figure 34. Select ‘Schedule workout’ at patient overview 38
Figure 35. Select training plan 38
Figure 36. Edit training plan 39
Figure 37. Assign training plan 39
Figure 38. Dashboard overview 40
Figure 39. Training plan templates overview 40
Figure 40. Patients overview 41
Figure 41. Overview of all available patient stations 41
Figure 42. Generate workout 42
Figure 43. Edit workout 43
Figure 44. Patients overview 44
Figure 45. Overview of all available patient stations 44
Figure 46. Edit workout 45
Figure 47. Patients overview 46
Figure 48. Patient’s calendar 46
Figure 49. Overview of all available patient stations 47
Figure 50. Generate workout 47
Figure 51. Edit workout 48
Figure 52. Patients overview 49
Figure 53. Patient’s calendar 49
Figure 54. Overview of all available patient stations 50
Figure 55. Training room – overview of all patient stations at the same time 51
Figure 56. Training room – select a patient’s station 52
Figure 57. Edit the currently running task at the selected patient station 52
Figure 58. Training room – select a patient’s station 53
Figure 59. Accept or reject the result from currently running task at the selected patient station 53
Figure 60. Training room – select a patient’s station 54
Figure 61. Change currently running task at the selected patient station 54
Figure 62. Training room – select a patient’s station 55
Figure 63. Click on ‘Edit workout’ to edit currently running workout 55
Figure 64. Edit currently running workout’s duration 56
Figure 65. Patients overview 57
Figure 66. Patient’s calendar 57
Figure 67. Interactive report for all tasks performed in that workout 58
Figure 68. Preview of generated report 58
Figure 69. Patients overview 59
Figure 70. Report categories 59
Figure 71. Example for report category ‘range of motion” 60
Figure 72. Example for more detailed data in report category ‘range of motion’ 60
Figure 73. Patients overview 61
Figure 74. Report categories 61
Figure 75. Patient’s report 62
Figure 76. Dashboard overview 63
Figure 77. Research overview 63
Figure 78. Create research in research manager form 64
Figure 79. Create research in research manager form 64
Figure 80. Research overview with new created research 65
Figure 81. Dashboard overview 66
Figure 82. Research overview 66
Figure 83. Research manager form 67
Figure 84. Selected research group 67
Figure 85. Select / Add a patient to research group 68
Figure 86. Dashboard overview 69
Figure 87. Select research task in therapists task overview 69
Figure 88. Selected research task in detail 70
Figure 89. Overview of all available patient stations 70
Figure 90. Repeat execution of this workout or mark the task as completed 71
Figure 91. Dashboard overview 72
Figure 92. Overview therapists tasks 72
Figure 93. Selected research task in detail 73
Figure 94. Overview of all available patient stations 73
Figure 95. Repeat execution of this workout or mark the task as completed 74
Figure 96. Dashboard overview 75
Figure 97. Researches overview 75
Figure 98. Research report categories listed per patient 76
Figure 99. Several research report categories 76
Figure 100. Detailed research report for example for category ‘divided attention’ 77
Figure 101. Detailed research report for example for category ‘divided attention’ 77
Figure 102. Detailed research report for example for category ‘divided attention’ 78
Figure 103. Detailed research report for each patient (comparing first and second execution) ‘relative mode’ 78
Figure 104. Detailed research report for each patient (comparing first and second execution) ‘raw mode’ 79
Figure 105. Dashboard overview 80
Figure 106. Settings screen 80
Figure 107. Training room overview 81
Figure 108. Dashboard overview 82
Figure 109. Export data settings 82
Figure 110. Live preview workout for selected patient 83
Figure 111. Preview fullscreen instruction for patients 83
Figure 112. Logo icon software patient panel 84
Figure 113. Virtual world presented on screen when workout is started 85
Figure 114. Login screen Patient Panel 86
Figure 115. Start screen Patient Panel 86
Figure 116. Start screen Patient Panel 87
Figure 117. Workout details – list of therapeutic tasks 87
Figure 118. VAST.Rehab disclaimer before starting workout 88
Figure 119. Start screen Patient Panel 89
Figure 120. Edit account data 89
Figure 121. Start screen Patient Panel 90
Figure 122. Messages form 90
Figure 123. Login screen Patient Panel 91
Figure 124. Settings screen 91
Figure 125. Login screen administrator 92
Figure 126. Select available Patient Panel instance to activate 92
Figure 127. Login screen Patient Panel 93
Figure 128. Create account form 93
Figure 129. Start screen Patient Panel 94
Figure 130. Set up workout 94
Figure 131. Set up workout 95
Figure 132. Workout details – list of therapeutic tasks 95
Figure 133. Login screen Patient Panel 96
Figure 134. Set up workout 96
Figure 135. Generate simple report of patient 97
Figure 136. Login screen Patient Panel 98
Figure 137. Settings screen 99
Figure 138. Dashboard overview with error symbol 100
Figure 139. Errors list 100
Figure 140. Settings screen 101
Figure 141. Feedback form 101

sports
quasar®

cycling & athletics
saturn® 300/100r

performance diagnostics
pulsar® med
German Engineering since 1988




inline skating
saturn® 300/125r

fitness
pluto® / mercury® / quasar® / pulsar®
functional training
pulsar® med + robowalk®

motion analysis
quasar® med
cross country skiing skating / biathlon
saturn® 450/300rs

expander training
robomove®
wheelchair
saturn® 300/125r

bike ergometer
torqualizer®
speed training / speedlab®
quasar® 3p

biomechanics gait parameters
optogait
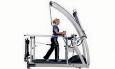


active gait correction
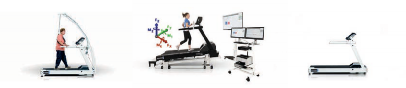
angiology
gait analysis / biomechanics cardiovascular stress
robowalk® expander / mercury® med
mercury® med
senior fitness
mercury®
gaitway® 3d with force and pressure measurement
orthopaedic rehabilitation
mercury® med / arm support / airwalk® ap
testing / CPET
mercury® med
mercury® med

locomotion therapy
locomotion® med 150/50
body weight supported treadmill therapy
cardiac rehabilitation
© 01/2026 h/p/cosmos [cos104823-app-man-en] Errors and omissions excepted. h/p/cosmos is certified according to EN 13485 for medical treadmills.
All technical data, descriptions, equipment variants and illustrations of devices, options and accessories are non-binding, in particular do not represent warranted characteristics and can deviate from offer and delivery. The Bluetooth®, Windows®, NFC® and further word marks and logos are registered trademarks. All word marks, logos and trademarks are the property of their respective owners.
airwalk® ap / mercury® med

bike ergometer
torqualizer® 1200
medical certification pending



environmental & climate chambers
quasar® med with external UserTerminal
biomechanics
gaitway® 3d
military / army
quasar® special version
speed training
sprint trainer comet®
fire fighter ladder training & fitness
discovery®

h/p/cosmos dealer contact:


manufacturer

 h/p/cosmos sports & medical gmbh Am Sportplatz 8
83365 Nussdorf-Traunstein
Germany
phone: +49 86 69 86 42 0
fax: +49 86 69 86 42 49


sales@hpcosmos.com www.hpcosmos.com


teams: @hpcosmos.com (search & select name) youtube: youtube.com/hpcosmos
TikTok: tiktok.com/@hpcosmos  facebook: facebook.com/hpcosmos
